In each of the Dirty Harry movies, star Clint Eastwood got to utter a pithy catchphrase unique to that movie. The first one, of course, was “Do you feel lucky, punk?” (Well do ya?) For the fourth iteration (Sudden Impact), Inspector Callahan challenged a bad guy to “Go ahead. Make my day” (a phrase so popular it became the unofficial name of a piece of legislation here in my home state of Colorado). For the second movie, Magnum Force, Dirty Harry reminded us that “A man’s got to know his limitations.” Indeed, he does. And I certainly know mine. As I posted in reply to Brad’s AR/AK dilemma, I am the poster child for mechanical ineptitude. As I near the end of my fifth decade on this planet, I’ve come to realize I’ll never tear an engine down on a weekend just because I have nothing else to do. Or for any other reason. Nor will I be constructing any home additions when I have the odd day off. Why? Because like a good Harry Callahan follower, I know my limitations. Which is why I put off building my own AR-style rifle for so long.
I simply didn’t think I had the mad mechanical skillz necessary to do it right. After a close friend from my Army days built his own, I began to look into the subject more deeply. After much research and thought, I took a deep breath, ordered my stripped receiver (which had to be transferred through an FFL) and my everything-but-the-stripped-lower kit (no FFL necessary, sent straight to my house) and got to work.
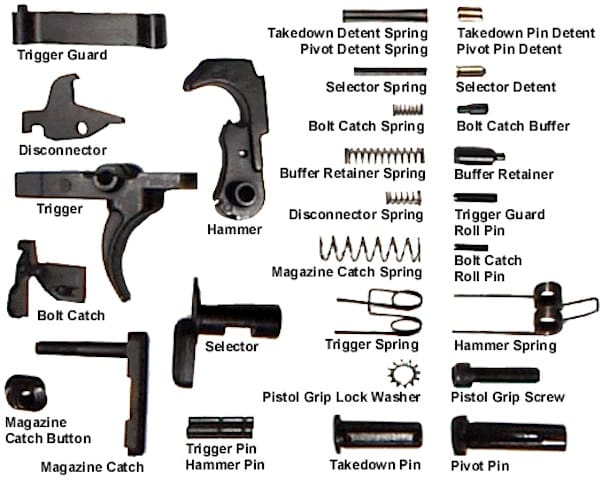
All I can say is that it was ridiculously easy. So easy, in fact, that I’m pinching my pennies to see how soon I can build my next one. If you own a home or a car, chances are that you’ll already have all the tools you’ll need: a screwdriver of some type (depends on what kind of screw holds in the pistol grip – mine was a standard slotted screw), a small hammer (brass or plastic is less likely to mar the receiver) and maybe a set of needle-nose pliers to hold the roll pins (there are also specialized roll-pin holders that might be better if you plan on doing this more than once). If you’re planning on building a collapsible-stock rifle, you’ll also need the stock wrench, which can be purchased for less than $10 at a number of web sites.
I hate reinventing the wheel, so I won’t go into details here. There are plenty of links at AR15.com, Brownells and other places. My particular choice was a link at AR15 that gave a step-by-step explanation, as well as having a link to a video that came in very handy; I actually followed the video more than the written document. (Links at the end of this article.) There are only a couple of tricky areas: roll pin installation and compressing the detent pin springs for the front and rear takedown pins.
For the latter, the web page guide I followed shows a neat trick using a razor knife/box cutter. The flat edge of the razor blade is used to keep the spring and plunger compressed until you slide in the takedown pin. As for the roll pins, there are a couple of methods, the brute force approach (which I used) and the more finessed, vice-grips approach my friend used.
The only caveats I’d provide for the roll pin installation (especially the pin for the bolt catch) is to liberally apply duct tape to the side of the receiver to keep it from getting scratched. Also, if I’d thought about it, a little bit of oil or WD40 on the roll pins might have helped them go in a little easier.
More helpful hints:
- It helps to to have a computer nearby. I just set my laptop on the floor and followed the video along (pausing frequently).
- There are a lot of small parts and springs. For that reason I did my assembly on the floor, reasoning that if I was already on the floor, the chances of dropping a part and losing it were less.
- Following the above, there are a lot of similar-looking parts (especially springs). Make sure you positively identify each part before you put it in, otherwise you will have to disassemble and remove the wrong spring to put in the right one (ask me how I know this).
So that’s it. If you’ve ever wondered when is the best time to assemble your very own AR, the answer is “NOW.” We all have our limitations, but if you can operate a computer, chances are that assembling an AR-15 type rifle from a parts kit is well within yours.
Web page:
http://www.ar15.com/forums/topic.html?b=3&f=4&t=226782
Video:
http://www.lifelibertyetc.com/RangeBag/Video/LLE_AR15StrippedLower.wmv


What brand parts did you use?
Also, as the entertainment guy, I'm obligated to point out that the actual Dirty Harry quote is "you've got to ask yourself one question: Do I feel lucky? Well, do ya, punk?"
I'm planning on building a mid-length M4 styled AR-15 later in the year.
Hi Robert,
I am completing my first build and had an expert lay out three different parts kits in front of me and he showed me differences among all three. I really recommend the Rock River Arms lower parts kit. A little more money than the competition, but is $20 gonna break ya?
Robert: Mine was a Del-Ton kit, and I used a Del-Ton lower as well.
How is the Del-Ton working out for you? They seem to have the absolute best prices, a lot of good options, and the reviews are all great.
I'm thinking of getting one of their 16" Midlength Kits with a Flat Top receiver. I'll buy a receiver locally to save FFL shipping costs though. Out there they're a dastardly $100.
Building an AR lower is a lot easier than any of the guides online lead you to believe. I went through four or five and found them all to be inadequate. Many don't explain exactly how the little parts actually are placed. The only really difficult part is getting the rear take down pin, spring, and detent to stay in place while you get the buffer tube and castle nut secured.
The one thing that you may need to pay attention to is the buffer tube diameter. There is a commercial spec and a mil-spec. The stocks are not interchangeable between the two.
Sabre Arms Lower – $109
CMMG lower parts kit – $59.99
DPMS Upper – $275
CMMG Bolt, Carrier, and charging handle. – $140
Magpul furniture. – $150
= $735(ish)
The Magpul stuff was not needed if I wanted to stay with the stock look. I just wanted some color. 🙂
= $584 (sans extras)
Comments are closed.