Over the last couple of years, my buddy, Cases4Cases (or C4C, so-called because he has a freaking case for everything he owns, including cases literally just for storing other cases), has enrolled in and participated in just about every community/city-level volunteer organization possible. That is, organizations related to disaster preparedness and response, such as Radio Operations Team, Search & Rescue Team, First Responders Team, Marine Response Team, Community Emergency Response Team (click here to find one near you), etc. In an e-mail to a couple of friends . . .
C4C detailed the building of his “CERT Kit,” which also functions as a Bug Out Bag (BOB) and Blow Out Kit (BOK). There’s so much great gear info and advice in this write-up that I figured I had to share it with y’all. What follows is a direct copy ‘n paste from C4C’s e-mail, with only personal/location info redacted:
So from my perspective there are a ton of different “kits” that can be built. Of course, all are based on your needs. In my still slightly novice opinion, each of the following would be built in a slightly different way and with the considerations following their name (note: I’m not expert. I’m still learning so everything is up for debate and adjustment.):
-Search & Rescue (SAR): Priority is to pack minimum supplies that will allow you or others to take care of just you. Needs to be light and compact enough that is it not burdensome. Focus on protective gear, water, food, first aid, and possibly shelter. Based on the situation, and since SAR is coordinated, additional supplies would be provided and split up among team members to carry to the site(s).
-Community Emergency Response Team (CERT): Similar to SAR bag but with more of a focus on rapid triage, light first aid, and documentation – less of a focus on shelter and food (that is the responsibility of the CERT leader). CERT members are activated, meet at a specific location, receive assignments (could be anything from coordination of volunteers to SAR deployment), and execute assignments. Documentation is key because municipalities get reimbursed by the Fed Gov for volunteer work…but only if everything is documented correctly. So this kit needs to have a little bit of everything in it; then you adjust it for your assignment and leave behind what you don’t need.
-Home Kit: The sole purpose of this kit is to be able to survive within your shelter for 1-2 weeks. Lots of food, water, first aid, lights, and batteries. This is the “big” kit because it doesn’t have to be mobile. Many people have an entire pantry or room for this “kit.” Go big so you can stay home during a real disaster.
-Car Kit: The sole purpose of this kit is to be able to survive if you can’t get home or if your car careens off a cliff and you survive but people don’t find you for days. I’d say it’s a paired-down version of the Home Kit, designed for 3-5 days of survival (# of people is up to you – if your car hold four or you have a family of four, plan to sustain four people). Most people put their kit in a big “Tupperware” box and tape it up or bungee it together.
-BOB/BOK: I see these as the same thing. But the “Bug-Out” part always tells me that SHTF and you need to relocate. For some this means bringing weapons, for others they wouldn’t even consider it (maybe because they don’t own any). These kits differ from SAR and CERT because their primary purpose is to take care of yourself/family and that’s it. There’s nothing else in the kit for anyone else. Focus is on survival only.
-Go-Kit: This is just the name I call my firearms/tactical kit. Its focus is on defense by force. The following items will be in the kit (not yet completed) – all within a relatively small rolling pelican storm case:
- -Pistol + 4-6 Loaded Mags + Holsters
- -AR + 4-6 Loaded Mags, Including one functional Drum Mag + Holsters
- -Survival Knife with belt and leg attachments
- -Polarized safety sunglasses
- -Gloves
- -Binos (compact)
- -Flashlight
- -Tactical Belt
- -Ear Plugs
- -Knife Sharpener
- -550 Cord (50′-100′)
- -Extra Batteries
- -Power pack for mobile phone
- -Silicone Water bottle
- -Maybe a rangefinder
- -Maybe a digital camera w/ video
The kit isn’t close to being finished so the list will definitely change.
So, with 6 kits listed, one has to determine what to invest in. For my situation, my CERT/SAR bag is also my BOB/BOK so that narrows it down for me. I didn’t do a good job prioritizing so I’m a little out of order in my preparation. If I did it again, I’d prioritize in this order:
- Home Kit
- Go-Kit (Firearms)
- Car Kit
- BOB/BOK
- *If applicable, SAR and CERT bags.
So since my CERT bag is also my BOB/BOK bag (I’d also grab my Go-Kit with my CERT Bag so I’d have sustainment + defensive tools), what’s in my CERT Bag??? Below are some photos and lists of items. I’m going to start on the outside of the bag and work through each module, which is a separate pocket. It is important to have your kits organized in a specific manner so you know where everything is at all times. (Note: I’m still upgrading this bag to more of a SAR bag.)
Cases4Cases’ CERT/SAR/BOB/BOK Bag:
Front View:
Obviously this is the bag lol. It’s molle format with multiple pockets and straps. I like the strap that goes over the top and down the front (through molle right now). The bag can be configured with two shoulder straps or one cross-body strap, which is nice if I want to carry my AR. it also has sternum and waist straps (must-have). The gear that is visible is:
- -4, 12hr Glow Sticks – 2 Red, 1 Green, 1 Yellow
- -Medical Cross – This lets others know I have a med kit. if I get injured and can’t communicate and need medical attention whoever finds me knows that I have the med kit in the bag; they don’t have to look for one and don’t have to use theirs.
- -Carabineer. I have them all over the bag. You never know what you’ll need them for and they don’t weigh much. Next and sort of behind the red glow stick on the left is a big stainless oval ring, too.
- -Between the glow sticks, attached to the over-arching strap is a small piece of camo 550 cord. This is actually rigged up so that if I lose my water bottle I can quickly attach a regular bottle of water to my belt or bag.
Top View:
- -CERT Patch. Lets people know I’ve been certified and can help.
- -American Flag Patch – duh.
- -Small elastic straps on either side of the handle. Same principle as having carabineers.
- -ID Card with Name and Phone and Radio Call Sign (if you have one).
Side View 1:
- -(2) Nite Ize Gear Tie T.U.B.E.s
- -Gerber LMF II Survival Knife with Sheath and built-in sharpener
- -Bubi Silicone Water Bottle (Rolled-up)
- -Random Nite Ize Locking Carabineer
Side View 2:
- -Tool pouch w/ molle straps to add stuff.
- -Random carabineer
Back View:
- -Emergency Whistle (must-have)
- -Carabineer (top of bag) to hang-up bag and keep of wet ground
- -Carabineer on shoulder strap for radio comms microphone or other items
Front, Small Pouch (one with the medical cross on it):
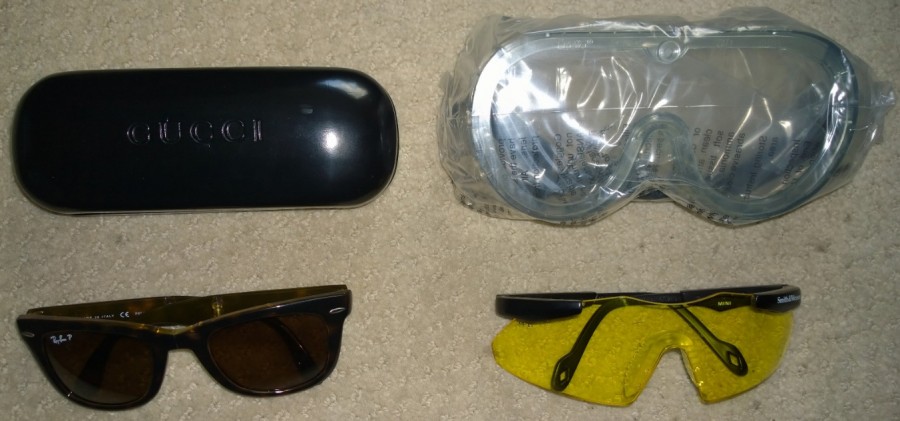
This pouch is dedicated to eye pro. I have goggles, yellow-lens safety glasses, and a hard case for my polarized safety sunglasses (Ray-Bans standing-in at the moment until I get the actual pair).
Front, Larger Pouch (below the eye pro pouch, has glow sticks on it):
(Loaded View)
(Unloaded, laid-out view)
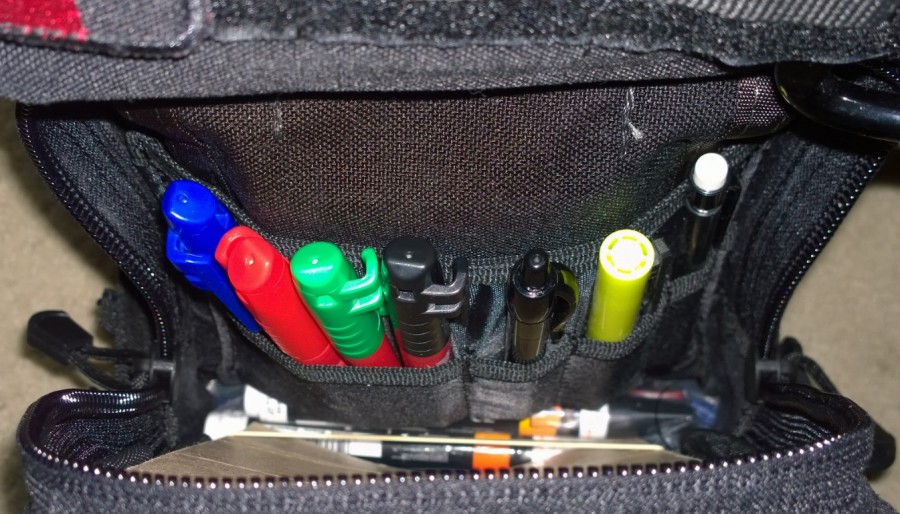
This is the documentation pouch. It has writing and recording items for all surfaces and weather conditions. Mostly for CERT and SAR stuff like marking houses that have been searched or noting hazards. Clockwise from top left:
- -CERT Field Operations Manual
- -Normal Lined Paper Pad
- -Rite in the Rain Kit: Pad (w/ rubber bands), Pencil (w/ extra lead and erasers), Highlighted, Black Pen, Blue Pen, Sticky Notes (3 colors), Map of City, all in a zippered pouch.
- -Writing Utensils that are at the ready: Pencil, Highlighter, Ball Point Pen (black), Permanent Markers (4 colors – can write on all surface in all conditions)
- (the following items are stored in a Ziploc bag and stuffed down into the pocket for when I need them)
- -Chisel Sharpie: Can write on cement. Large tip.
- -Paint Pens (3 colors)
- -Wax “Chalk” (3 colors)
- -Extra Pencil w/ erasers
- -Extra Ball Point Pen (black)
- -Extra Sharpies w/ rings for attachment to bag shoulder straps (2 colors)
Middle Pocket:
(Everything laid-out)
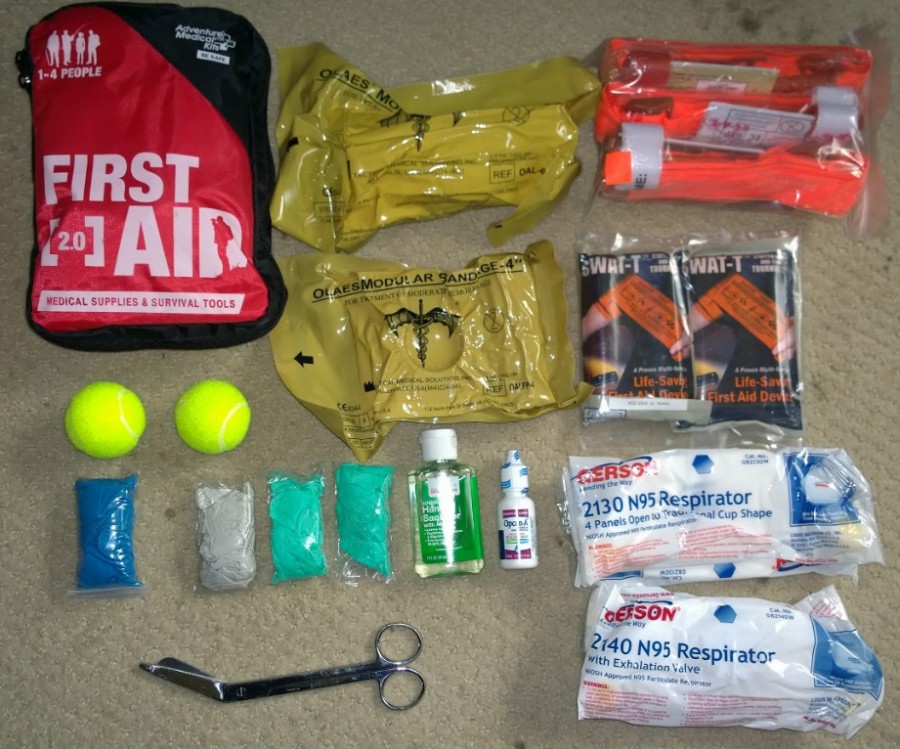
This is my medical kit. Its primary purpose is to support me, not anyone else. But if I’m fine and I don’t have supplies for another injured person then I’ll use my items to help them. Clockwise from top left:
- -Adventure Medical 2.0 First Aid Kit (1-4 people). I’ve added a few items to it (see next photo and details below).
- -2 OLAES Bandages. These are awesome. They have a ton of uses. Check out the video: https://www.youtube.com/watch?
v=om_xyrA4ClA - -3 CATs (Combat Application Tourniquets). These are also awesome – as good as they get – pricey, too. You want at least four tourniquets because you have four appendages. “But you only have three?”, I hear you say…
- -2 SWAT-Ts. These are a tourniquet and as well as a pressure-wrap. Dual purpose so I technically have five tourniquets and 2 pressure-wraps (plus the OLAES bandages, which are also sort of pressure wraps).
- -2 Gerson N95 Respirators w/ vent valve
- -2 Gerson N95 Respirators w/o vent valve
- -Eye Drops
- -Hand Sanitizer w/ Aloe
- -4 pairs of medical gloves, individually packaged (three different thicknesses, as indicated by their colors)
- -Medical Scissors
- -2 mini tennis balls. These are used at a pressure point (like behind leg). If someone had a very bad laceration and I wanted to stop the bleeding but not use a tourniquet, I might put the small tennis ball at the main arterial pressure point and use a pressure wrap to slow the blood flow.
(Inside of First Aid Kit)
You can go onto Adventure Medical’s website to see everything that come standard in this 2.0 kit. I’ve added the following:
- -Clothing strap (top left, green w/ white clips). Allows you to get your clothing out of the way if it’s baggy or put a protective layer over your clothes. Can be used in other ways, too.
- -Bulb Syringe (the round thing at the top of the right side pouch)
- -CPR barrier in pouch w/ keyring (bright orange, next to the bulb syringe)
- -Water purification tablets (can’t see them – in the fold-down pouch on the right side)
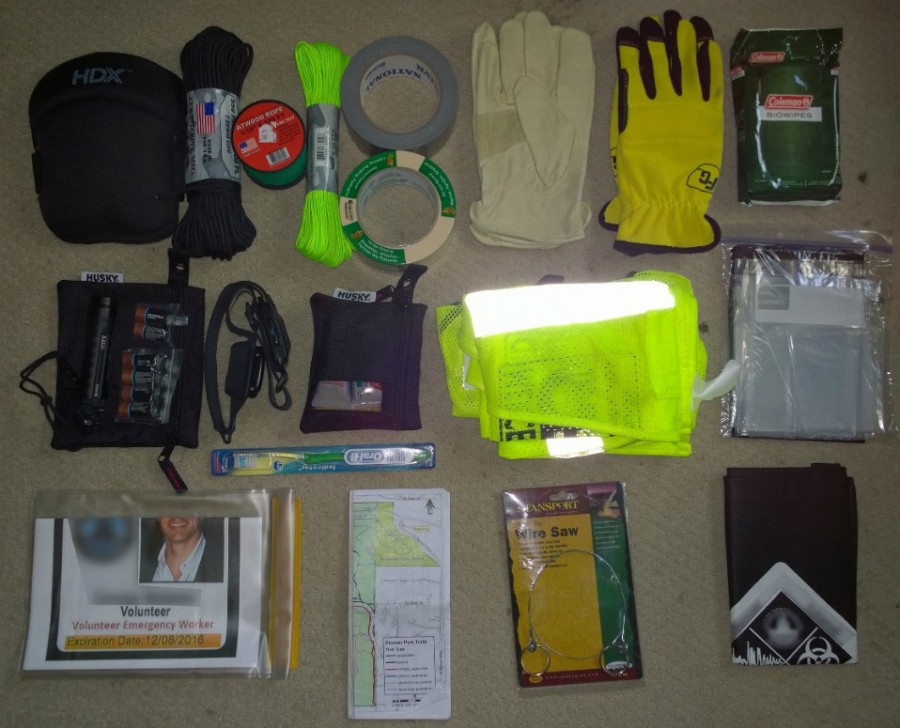
Main Pocket:
Right now this is disorganized and needs to be more refined. Some of it has its own home in a pocket inside the main pocket, I’ll note that stuff. Clockwise from top left:
- -Knee pads for SAR
- -Cordage (550, lighter use, and Medium use). I need to get rid of one of these – it will probably be the roll of light-use. The bright green stuff is good for visibility.
- -Duct Tape
- -Masking Tape. The manual says we need this for labeling searched structures and vehicles but I might remove it because it takes up a lot of room and is relatively heavy.
- -Leather Gloves
- -Light, ventilated gloves
- -Wipes to use as TP or to clean hands and face
- (the next series of things all go into one internal pocket):
- -Bags of all sizes: 1″x3″ ziploc, 3″x4″ ziploc, Quart ziploc, Gallon zipoc, 30gal Garbage Bag (1-2 of each type). All within one Ziploc bag
- -Tote w/ handles (black bag w/ logo)
- -Wire Saw
- -Maps
- -Documentation Pouch: Copy of Volunteer Credentials, Radio Operator Credentials, First Aid-CPR-AED Credentials, etc. All in waterproof roll-top style pouch.
- (the rest of the items in the middle of the pile, starting from the yellow vest and moving left)
- -Official CERT Vests
- -Personal Items Kit: Toothpaste, Chapstick, Medications (if needed), Handkerchiefs, $50 cash in different bill sizes, etc.
- -Headlamp (this one is a stand-in for the photo). I’ll probably get a battery-operated one.
- -320 lumen flashlight w/ batteries. Extra batteries. All in zippered pouch. Batteries in Ziploc bags.
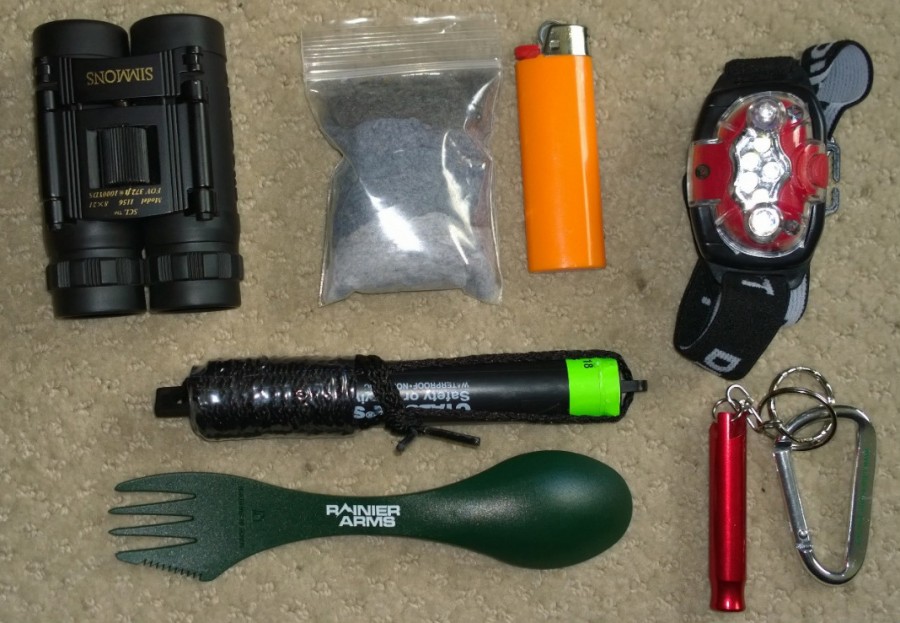
Additional Internal Pouch within Main Pouch:
There is another little pouch at the top of the inside of the main pouch. I have a bunch of smaller stuff in there, but I need to re-organize it all. Clockwise from top left:
- -Compact binos
- -Bag of lint. Yes, Lint. I collect most of my lint from the dryer and package in small Ziploc bags to use as tinder for fire-starting. I still need a flint bar to use in conjunction with my survival knife to spark.
- -Lighter
- -Extra headlamp
- -Extra whistle, Split Rings, Small Carabineer
- -Eating utensil (Rainier Arms LOL)
- -Cyalume ChemLight Military Grade SOS Signal Light, High Intensity. You unwrap the cord, pull the stick from its housing (black plastic tube), snap it to turn it on, then pull the light and housing to opposite ends of the cord. Grab the plastic housing and start swinging the ling in a circle to get the attention of someone (usually a helicopter or some other aircraft).
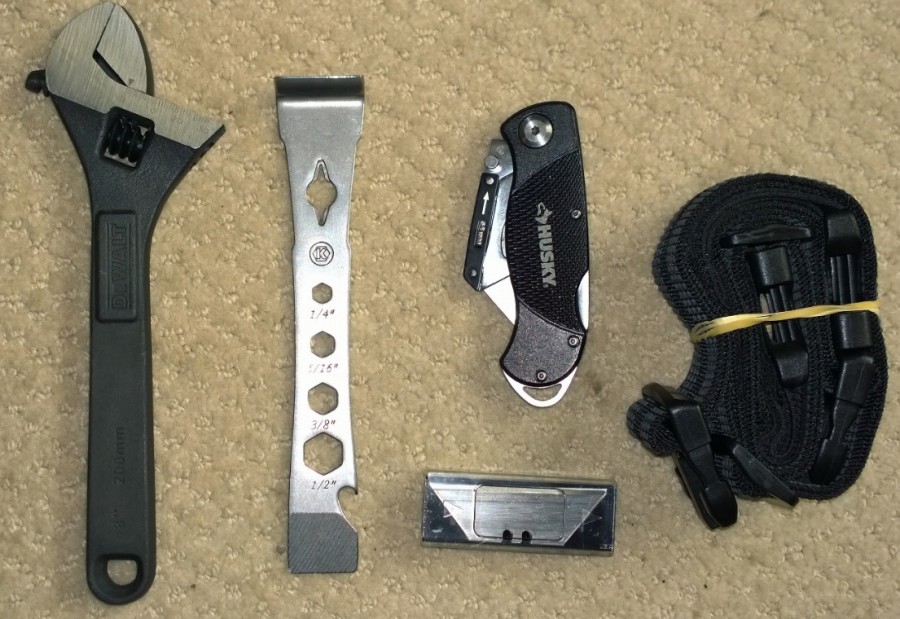
Tool Pouch:
Tools are heavy so I keep them to a minimum. I will always have a leatherman on my belt so I had that in mind when putting this together.
- -Adjustable crescent wrench
- -Kobalt 6-n-1 tool
- -Foldable box cutter
- -Extra blades for box cutter
- -Leg straps for Gerber LMF II Survival knife
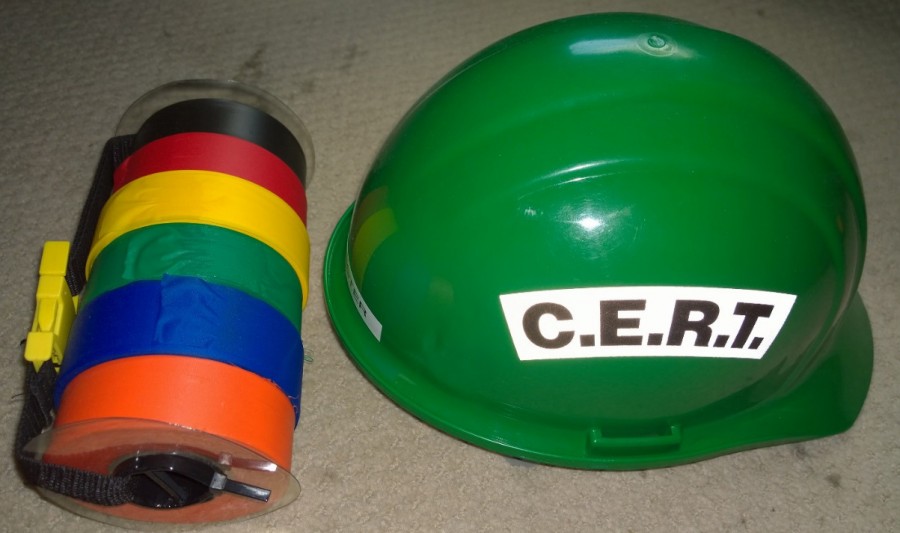
There are two other things that I don’t have attached to the bag at all times. This is because one is big and one is really heavy: Helmet & Triage Tape:
In addition I will always have my handheld transceiver on my belt or backpack. I’ll most likely run a radio microphone that attaches to my shirt or bag strap and will have an extra battery or two as well as the GPS attachment.
Oh, and I also now bring this bag to the shooting range, when hunting, or when doing anything with a high degree of danger or not in close proximity to professional help. I just leave it in the car, though, I don’t bring it with me when hiking or into the range, etc.
So, yeah, that’s the kit so far. It will evolve and become better. Let me know if you have any questions about any of the items or even if you have suggestions.
-Cases4Cases
Oh…a few other things I forgot to mention:
- -I need a beanie in there
- -I need a space blanket in there
- -I may put in a poncho (can also make one from 30gal garbage bag)
- -I will always try to throw in a small snack.
- -Always dress appropriately when you deploy with this kit!
And I’m also working on a laminated card that lists the items I need to grab when I am activated which are not in the kit (and probably won’t ever be). These things will most likely remain on my body at all times, which is why they are not in the kit:
- -Dress appropriately
- -Volunteer Badge & Other Credentials
- -Fill Water Bottle
- -Hat (as appropriate for the conditions)
- -Shemagh
- -Small Knife
- -Wallet
- -Radio
- -Handkerchief
- -Leatherman
- -Mobile Phone Charger
- -Belt w/ clip for water bottle
- -Watch
- -Boots, Sneakers, & Extra Sox
- -GoPro if appropriate







-Masking Tape. The manual says we need this for labeling searched structures and vehicles but I might remove it because it takes up a lot of room and is relatively heavy
—————————
Replace it with Barricade Tape.
The big yellow tape with Caution written on it is a type of barricade tape, but there are many many more. You can tape that is visible from a distance and lets your team mates know that that structure is checked.
It’s much much lighter than masking tape.
Thanks for your thoughts regarding the masking tape. Barricade Tape (ex. Yellow Caution Tape) is definitely a great marking tool to have. I believe CERT includes Masking Tape in their bag contents list with the idea that it can be used as an adhesive “clean slate” surface to write on. I don’t think they intended it to be used like flagging tape (ex. Caution Tape) which already has text on it. Since the primary purpose of this particular bag is for CERT response, I would typically rely on CERT protocol for marking searched structures and vehicles (the four-quadrant “X”). However, I do have a detachable bundle of 6 colors of Triage Tape (see last photo in the article). Triage Tape is very similar to Caution Tape except that it is thinner and does not have writing on it. I can bring the bundle with me or decide to leave it behind and I can also remove colors from the bundle to lighten the load. Four of the six colors (Black, Red, Yellow, & Green) indicate the medical status of a person. The other two colors (Blue & Orange) can be used for marking/flagging.
These lists definitely helped me remember a few things that I need to add/replace in my own UAAO bag.
How much does all that weigh and how long can you walk with it?
My question exactly. For lots and lots of people this is critical. I rarely see weights in blog posts that describe BOB/BOK’s and what goes into them.
What is shown and described is a CERT bag, quite different from a BOB (acronym for bug or bag). Unless you are a team member, you will not need all this stuff. Build your BOB the way you see fit based upon your personal needs, but make sure you include what you NEED to get you where you are going. Basic needs are water, shelter,, food and the means to prepare it, and navigation aids. Build it and practice carrying it. Take it on hikes. Make it personal. Each person will have slightly different needs. Will you have a spouse and children with you? Will you be with a small group? Do you have skills? Do you have training? What do you really need versus what do you want? Weight versus practicality. Do I need an axe or can I get by with a knife. What about a lightweight saw? Storm proof matches and a rod or do I have the skills to start fires with the rod alone reliably every time? Do I need a tent or can I use just a small tarp? What about bugs? Are they really bad where I live? How much comfort do I really need? Do I even have a plan? Do I have a place to go and how far is it? Can I make it there on foot or do I need a vehicle like a bicycle in case there is no fuel? Will I be armed? If so, with what? Pistol or rifle or both? How much ammo is enough, too much? If you have never thought about it, now is the time to start. What works for me nay not work for you. Sit down with your family members (yes, kids too) and discuss it. From the time my boys were conscious, I began training them. It is never too soon to start.
Good question, guys. I’m not certain how much the CERT bag weights in the configuration noted in the article. It’s too light to register on my digital scale in the bathroom and I can’t find my fish scale at the moment (sorry!). But remember that the bag has a modular design so that sections/groups of equipment can be removed to lighten the pack when possible. I don’t anticipate carrying 100% of the bag’s contents 100% of the time. I do anticipate removing items before deploying and also adding some items such as food and water, which can be some of the heavier items in the bag.
The second question, “How far can you walk with it?” isn’t one I can answer. Too many unknown factors come into play (weather, the specific individual, and terrain, to name a few) and this question would need to be re-evaluated as progress was made and any changes to the situation came into play. One of the best things an individual can do is to test their abilities with the actual equipment. Go walking or hiking with the bag on and see how it feels. Too heavy? Either reduce the weight of the bag or possibly adjust your exercise routine so that your body can handle the weight of the bag.
The things Gary mentions in his reply are spot-on and I agree that no matter what type of bag you are working with it will be a never-ending product. You will (and should) always be refining the contents (and even the bag) to make it more effective, efficient, and applicable to your scenario(s).
Very nice and well thought out. I have been doing the same thing since about 1968—always keep some sort of go bag ready (different ones for different purposes). I am glad to see that other like minded people are getting the info out to others. Just be careful not to confuse a nite eyes S-hook with a carabiner—that is s mistake that can get you killed. A Carabiner (Biner) is designed and marked to indicate its rating for climbing and rappelling while the nite-eyes S-hooks are designed for gear attachment. I go so far as to separate my high angle equipment from my fast water equipment. Once a Biner or rope has been used for water rescue, it NEVER goes back in my climbing bag due to the fact that fast water will imbed small abrasive particles into the fibers of the rope and into the hinges and gates of the biners. This can cause stress that will lead to failure and failure should never be an option.
Another area of concern is this—just because you have a kit does not automatically mean you know what to do with it. If you are not trained, get trained! Learn not just how to live off grid, but how to be of service to others, how to help out in the community, how to do basic repairs on cars, clothing and structures; learn about communications networks, setting up a triage, and how to perform first aid with and without s first aid kit.
What if you don’t have time to get to your kit? Do you carry the bare necessities on your person at all times? Never leave the house without a pocketknife and a small LED flashlight (I carry a Fenix E-12) in addition to your wallet and smartphone (it’s amazing what you can get done with these things!) plus, one item I always carry in my pocket is a ferrocerium rod (flint and steel fire starter). I cannot even begin to tell you how many times my knife and flashlight get used every day.
Bottom line is that survival and service are not just about gear—they are about attitude and training and common sense thinking. I have rescued many who had gear but either had no clue what to do with it or became depressed and never even tried to use it. I could go on for hours, but I think the point has been made.
BTW, just for credentials, I have been doing this stuff most of my life, beginning in 1957 when my dad began teaching me the basics, then as a boyscout and later as a leader and scoutmaster, as a soldier (Vietnam era), as a SAR team leader in the military (7 years US Army), 5 years as a LEO in the DFW metroplex, 30 years as an instructor of rappelling and 27 years as head of first aid and rescue for whitewater river trips with group sizes ranging from 22 boats to 54 boats on river at one time on class 2 to class 3 water. I have a little bit of experience. Never miss an opportunity to learn!
Great input, Gary! I agree about the carabineers – one cannot confuse a rated carabineer with one that is merely a “clip” for carrying or attaching things. You probably noticed that there were no items in the CERT bag rated for climbing or rappelling. As you mentioned, this was on purpose – anything that is rated for climbing is in my SAR modules. And, YES!, just because one has the gear does not mean they are qualified to use it. One must become educated/certified and participate in routine exercises to maintain proficiency and then also have an appropriate attitude and mindset.
The main reason I mentioned the biners vs clips is because there are two carabiners shown on the bag along with several S clips. I ALWAYS carry several carabiners plus 1″ tubular webbing in case I need to create a Swiss seat for a hasty descent. Back in my scouting days, each person carried a 6 foot length of rope with eyes spliced in each end—these could be linked to form longer ropes for emergency climbing and descending. Not a bad thing to consider.
How far can you walk with your BOB?
Don’t assume roads are passable or that gas is widely available. At least have it seperated into stuff you can carry vs stuff you’ll ditch if you need to leave the car.
Almost every kit should include a compass and a guaranteed way to start a fire in adverse (windy and wet) conditions.
Any kit for longer term survival should include a way to start hundreds of fires in good conditions (such as a flint and steel).
Looks like fun! Bug out bags and whatnot are a constant process. Mine include crappy emergency food and water as well. My MREs are outdated and need replacing.
I don’t think being past the expiration date makes MREs taste any worse 😉
A link to FEMA they are going to put everyone in concentration camps and sell all of our things to the chi coms while it rains chickens in D.C.
What?
I seem to recall that there is a version of lint and wax that is supposed to work better than just lint. Might be worth a look. Also a military poncho has more uses than just a rain cover. Given the areas you are working in webbing also might be worth a look as well . Just some random thoughts YMMV.
You have to be careful with lint taken from a dryer because many clothing articles are polyester and does not make a good fire starter. If you use lint, make sure it is from laundry that is 100% cotton. Alternative is to use cotton balls saturated with petroleum jelly. A spark can ignite it. If using wax or parafin you must expose it to flame such as a match or toilet paper you ignited with a spark. Steel wool and a battery work well but are bulky.
I agree that 100% cotton lint is much better than lint that is a mixture of types of fibers. However, any lint is better than no lint! Another form of tinder that works well is saw dust. If you have a wood shop at home or work collect some of the saw dust and put it into a small watertight/airtight container and use in conjunction with your sparking device. One downside to saw dust is that it doesn’t allow you to make a little “basket” to catch the spark (like you can with lint) and it can also disappear quickly if exposed to wind.
On the subject of lint—100% polyester really does not burn, it melts. Cotton balls (the real ones, not the polyester ones) make great fire starters. Back in the day of real film, I used to save 35mm canisters for use as waterproof containers for fire starting material. Sawdust from a saw is not nearly as good as shavings from a router. Commercial firestarters are super good, not too expensive, and pack well in a plastic sandwich bag—lightweight and easy to ignite with a spark. In my wilderness hiking pack, I carry those plus a bag of grass (not the smoking kind) to use with my spark system. In the military, we had a decontamination kit on our M-117 mask; those empty containers are larger than film containers so you can put the starter materials plus the ferrocerrium rod in it along with stormproof matches.
get an altoids tin and an old pair of jeans and make char cloth. a quick googling will show you how, I keep a 6 inch square of char cloth folded up in a small accessory zip lock bag with a firesteel
Char cloth has been around for centuries; it works well with flint and steel but is not nearly as good as something that catches fire and turns to flame. A burning ember is not quite a good as a flaming pile of dried grass or cotton lint. Personally, I prefer to carry the commercial fire tinder made by Coghlan—you can pack a lot of them in a very small space and they burn really hot for quite a long time (and they are not very expensive at all). If you want to make your own, warm up some vaseline and saturate cotton balls (real cotton, not polyester) with the jelly and then pack them into an old 35mm film can if you can find one or any similar container—those are cheap and they work great.
Lots of good ideas and pointers. I would add/ suggest the dead on brand destructo bar for cert situations or the ever loved e-tool.
I have a folding saw in my gear too, but based on my location and disaster types my gear will be slightly different than the next guy.
An article worth the reading. More of these please.
I saw some CERT members recruiting at the local fire dept’s open house here in California. I told them no thanks, after they told me they are not allowed to help people, only “catalog findings”. See a guy bleeding? Leave him there, someone else’s problem. Same for drowning person, etc. THAT goes against my every instinct! No WAY!
Ed – Thanks for sharing your experience. What you described is not typical of the CERT program. The CERT program is a National program that is run by FEMA so no matter where in the country someone earns their CERT certification they still have to adhere to the same set of procedures and whatnot as anyone else with the certification. All CERTs study the same material and pass the same exams.
The purpose of CERT is to “Provide the greatest good for the greatest number of people.” Many people find this difficult to come to terms with. For example, if a CERT is deployed to do START (Simple Triage and Rapid Treatment) and they come across someone who is not breathing the CERT will try to resuscitate them three times. After that if the victim is not breathing on their own they need to mark that person as deceased and move on to the next person. They should not stay with that one individual and perform CPR to try and keep them alive. The reason for this is that if one person helps only person they are not doing the greatest good for the greatest number. CERTs are only deployed when there is a scarcity of resources, meaning that in a situation where a CERT is deployed they will most likely have to cover a lot of ground and/or contact and assist many individuals. This is often misconstrued into what you have described – “not being able to help.”
Now, just because some is a CERT does not mean they are absolutely bound by the rules and regulations of CERT. If you were a deployed CERT and came across a victim and you felt that you needed to stay with them instead of help others, then you’d just take your CERT vest/identification off and you’d be a “regular citizen” again. Except you’d be a citizen with CERT training to help that person.
My advice to anyone who is leery about CERT because of one of their regulations or “guidelines” is to just take the course anyway. You’re going to learn a heck of a lot of great stuff and you have zero obligation to act as a CERT.
Good article.
I have been looking for a bag like this. What size is it (dimensions and liters) What is the brand of it? Where did you buy it?
I believe the pack is the 126: Compact Assault Pack by Condor. Here are some of the specs from their website:
– Total of four compartments:
– Main compartment: 18″ x 10″ x 5″ with one zipper and one mesh pocket.
– 2nd compartment 15″ x 8″ x 2″
– Front top compartment: 4″ x 7″ x 2.5″
– Front bottom compartment: 10″ x 8″ x 2.5″
– Hydration compatible
Comments are closed.