The Ruger Mark I/II/III and 22/45 series of pistols are awesome little guns. And like the 10/22 rifles, plenty of people count their first pistol experience as one that involves Ruger’s .22 plinker extraordinaire. One problem — some might say the only problem — with the pistols, though, is how damn difficult they are to disassemble and reassemble for cleaning. Enter this oddly shaped, but VERY functional tool from The Right Tool Company . . .
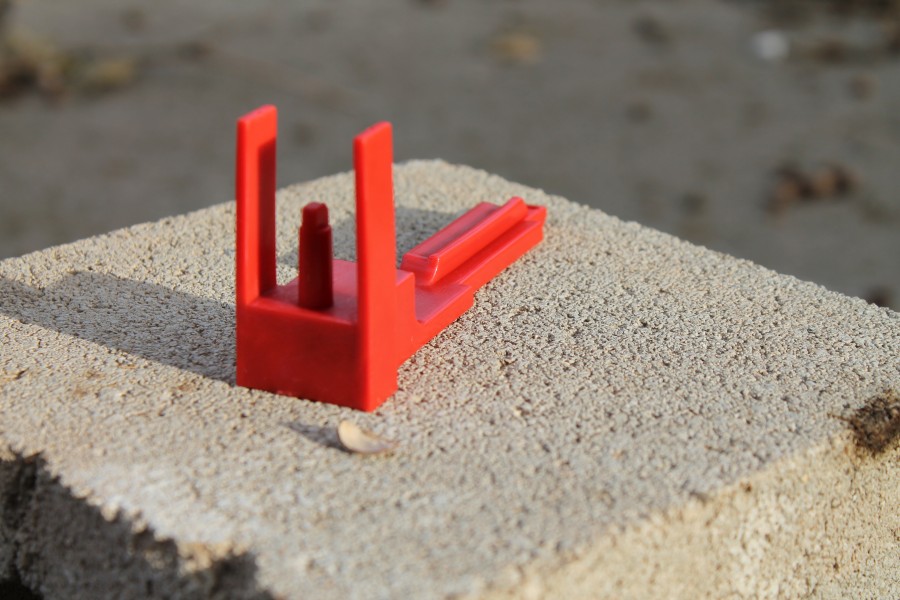
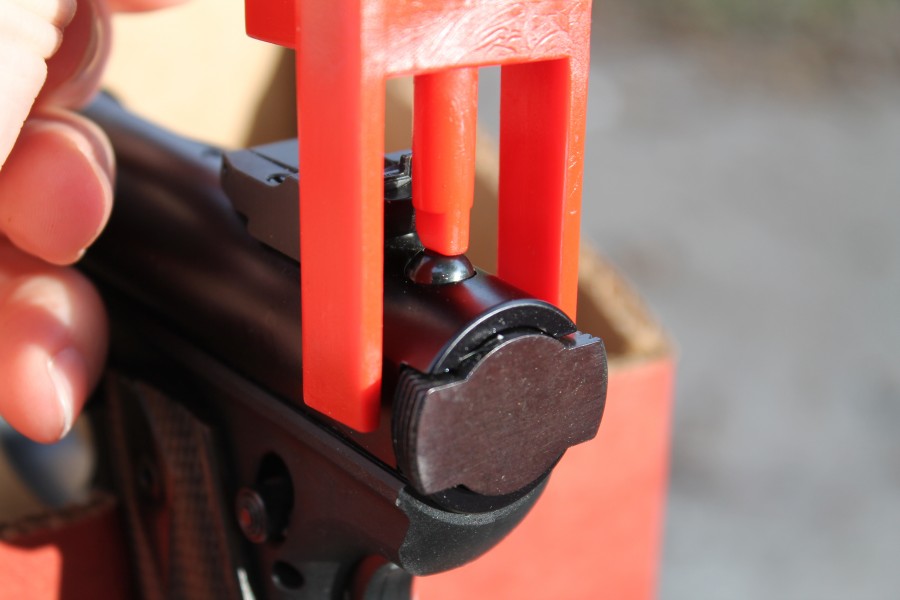
The All in One Tool is a single piece of Delrin shaped in such a way to assist with the takedown and reassembly of the aforementioned pistols. Before I go much further, let’s cut to the chase: if you own one of these guns, you should own this tool. Now, I love me some specialized tools, and this is 100% a very specialized tool. So specialized in fact, that I went to the trouble of creating an internet meme to perfectly (if I do say so myself) sum up how I felt about cleaning my 22/45 before I got the All in One Tool.
Oh yes, I do love a good meme. But sadly, my 22/45 stayed very, very, very dirty because I loathed cleaning it. Without fail, I’d scratch the finish trying to pry the action spring piece out. Then I’d do the same pulling the action spring assembly out. Finally, once everything was clean, I’d have a hell of a time getting the whole thing back together because there’s some precise alignment required to git ‘er done. So, the 22/45 would stay dirty. Every now and then, I’d clean it, but I’d always set aside a few hours to do it.
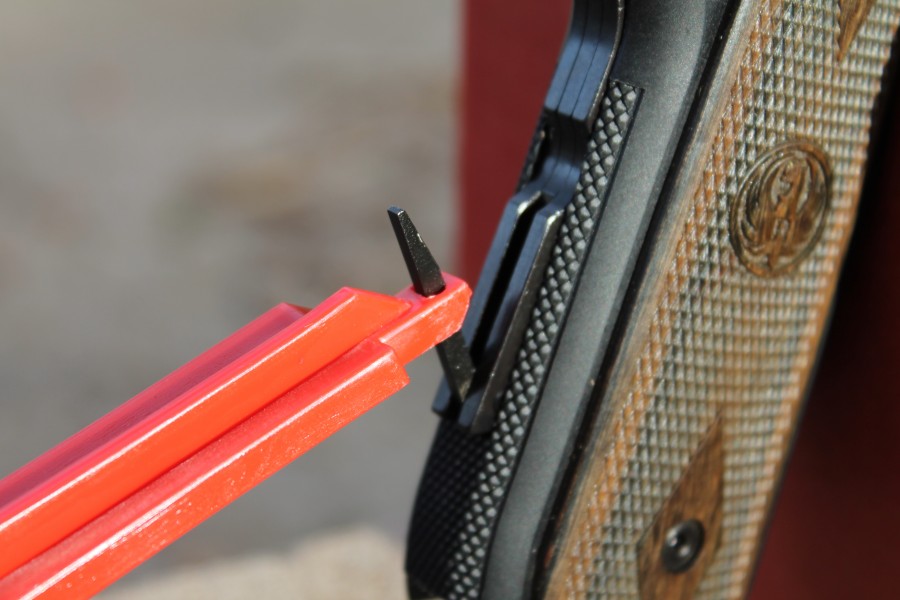
Now that I have the All in One Tool, teardown takes all of 30 seconds thanks to the purpose-built hook that pulls the action spring apart without scratching the finish on the frame. Before, I always used a paperclip which scratched the finish. Or a fingernail, which always ended up peeling away from my finger leading to much cursing of Bill Ruger’s ghost.
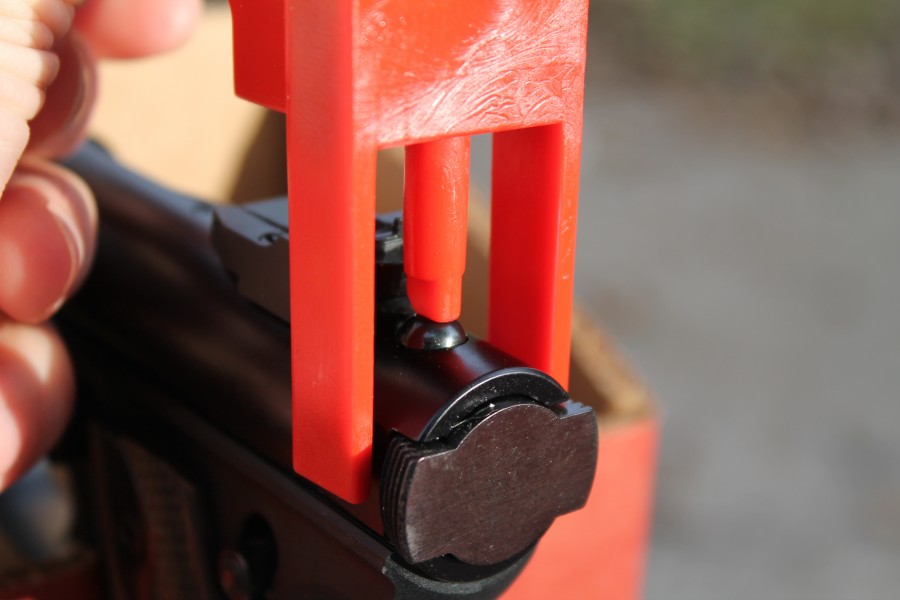
Reassembly still isn’t easy compared to say, a GLOCK or M&P, but thanks to the All in One tool, it goes a bit smoother thanks largely to the long shank that helps align the hammer properly. Assembly time is cut from maybe fifteen really frustrating, profanity-laced minutes, to five minutes capped with a hearty “HUZZAH!’
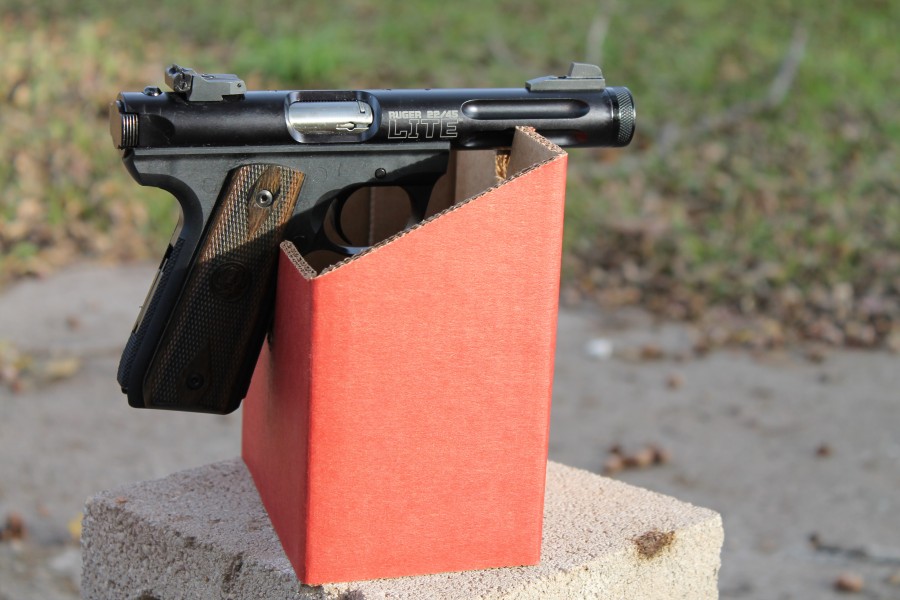
The tool itself can also be purchased with an optional gun holder made of cardboard and shaped in such a way to hold your Ruger pistol while you do work. I can take that or leave it, but if you don’t have a proper workbench area, this might be a handy little addition. Ready for the best part? You can get the holder and tool, shipped to your house on Amazon for less than $35. If you don’t want the holder, you can get the tool alone for $21.95 plus $3.89 in shipping.
Ratings (out of five stars):
Overall Rating * * * * *
This is an awesome little tool, and if you hate cursing, scratching your gun’s finish, and wasting time, it’s well worth the three Alexander Hamiltons it takes to put one in your toolbox.
UPDATE: Amazon is back up and running. You can purchase the tool by itself here or the package here. You can also contact Right Tool Company via the Facebook page.




Oh, my gosh. My Ruger Mk II is incredibly dirty… You wouldn’t believe how many bad words can come out of an old lady’s mouth while she cleans that thing.
Got to have me one of these. Thanks, Tyler!
OOPS… neither of those links to Amazon are functioning properly…
Those links worked earlier. I tried the link at the Right Tool Company Facebook page, too, and it’s no longer working either. You’ll probably want to contact them via their Facebook page.
https://www.facebook.com/TheRightToolCompany
Haha!
Probably because they are being bombarded with orders!
Facebook! What the hell’s Facebook? You mean there’s somebody on this blog that actually does Facebook?
How about Buttbook”??
I know what your thinking! Your thinking that on me, the later would probably look better. THINK AGAIN! Since my cancer and radiation treatments on the lower extremities, the former has it by a mile!
Thanks, Dan, but I don’t “do” facebook for anything. I sent a note to Amazon customer service and will see what they say.
I too must have this. If only it could also polish out the idiot marks on my beloved MkII target…
tool kit needs to include a five pound hammer to reassemble . at least that is what my 22-45 mark III requires.
a real beast. regular mark 512 or other stainless beauties are not so difficult.
The last time I shot a 22/45 was when I shot a friends 22/45 way back in middle school (20+ years ago). I have a feeling that the pistol probably hasn’t been cleaned since then if they are that hard to break down.
I think they are going to sell out of this tool in 3, 2, 1…
Funny, this serendipitous timing thing. I was just at the range with my 22/45 getting a new optic zeroed.
stainless bull (6 7/ 8″?) bbl gov’t mkll here. never even thought about cleaning it. spray her down occasionally. y’now, with spray. no problems in 25yrs of driving nails (not quite tacks).
thanks for the tip. i’ll get the tool and figure it out.
wish i still had the blued one i gave to a gal back then…
Am I the only person in the world who has no problems disassembling/cleaning a Ruger MK I/II/III?
Wow, it’s wonderful to be in a class by myself.
Wait- I always have been… the teachers always sent me to the coat closet…
I have zero probs also.
My trick was to install a paperclip to my safety release key (22/45 LITE) – I use the paperclip to grasp the mainspring lever. Everything from then on is easy as pie!
Yeah I feel the same way, never understood why these mystify so many people.
No problems in past 55 years. MK I when I was 15. Have owned every model except 22/45. The MK 10 is excellent in supine position at long range.
Just point the muzzle up so the hammer strut can be captured by the mainspring.
Target models might be helped with a 12 ounce plastic hammer or a 2×4 because the frame hooks are tight.
Until I made myself a loading tool to push the magazine follower down my arthritic fingers did not like the tiny button.
Er. Mu. Gerd. Thank you. JWT
“… pistols. Before I go much further, let’s cut to the chase: if you own one of these guns, you should own this tool.”
Sold. The Mk I/II/III market has needed this for decades.
I got so fed up cleaning my Mark II Target that I bought a Speed Strip kit for it. It allows pulling out the bolt without parting the grip from the barrel/receiver. Now I pull it all the way down once every couple years to clean the trigger group area. The trigger is a bit better too, with the replacement hammer in the kit.
My bro-in-law might go for this tool though, I know his Mark III sat apart for almost a year because he couldn’t put it back together.
That was my problem with the 22/45: re-assembly. If this tool could fix that headache, I would own one again.
So, am I the only one who has no trouble with their Mk iii 22/45 and can do it practically blindfolded? It’s really not that hard, for me at least.
The first few times it is a royal pain in the arse. I’ve got it down now, but really, why tear down a stainless MKII? Spray it down IF it quits working (mine never has) and go on.
+1
What is the big deal? The Ruger is no Glock, but I certainly don’t think it takes any specialized tools. A brass or nylon mallet is handy to get the barrel/receiver off the frame when they are new and tight. To completely disassemble some brass punches are nice. Other than that you don’t need any tools as far as I can tell. More practice will work as well as this tool.
No. I don’t have a 22/45 but have a Mark III Hunter and an old standard before they gave them numbers. I can take them apart and put back together in way less than a couple minutes.
No you’re not the only one. Not that hard with practice. But that would be the same for just about any assembly/disassembly process.
Nope, really not that hard at all after a person understands the process, vs flailing around randomly and cussing at the pistol.
The part that gives most folks problems during reassembly is getting the hammer strut back on top of the mainspring cup as they pivot the mainspring housing into the frame. The procedure I was taught by a gunsmith many years ago is as follows:
– Insert bolt, point pistol straight down, pull the trigger, hammer flops forward (MK-III owners, you’ll have to insert the mag before pulling the trigger due to the mag disconnect).
– Push mainspring housing pin upward through frame and upper receiver hole; if it binds, wiggle/rotate the housing from side-to-side as you push upward (if you keep the pressure on as you wiggle/rotate it, it will eventually pop through).
– BEFORE closing the mainspring housing into the frame, point the pistol straight up. This gets the hammer strut into a better alignment with the mainspring cup, lowering the chance it will get misaligned during closing. Keep the pistol pointing straight up as you carefully pivot the housing into the frame. When you close the latch, if the housing moves deeper than normal into the frame (below flush with the surface), this is a sign you missed getting the hammer strut into position; unlatch the housing and reopen it, check the alignment (you can see up into the frame cavity if the light is right), and close it again. It only jams the mechanism when folks jerk the bolt to the rear with the hammer strut out of position, so EASE the bolt back the first time you move the bolt, and if it doesn’t open all the way, stop, open the mainspring housing up, and try again.
With a bit of practice, you can do it in a darkened room 99 out of 100 times, but most folks just don’t do it enough to get the procedure locked into their minds. Do it once or twice a week for a couple of months, or once a day for two weeks, and you’ll never have problems with it again.
Ibid.
It’s straightforward if you RTFM. And don’t try to go off your experience with 1911s, GLOCKs, etc.
Come to think of it, I have a Mk III as NY first-ever pistol. Never had any trouble with it until I bought a CZ 75 and was introduced to a different manual of arms to keep straight.
Now I have disassembly / cleaning / assembly instructions and notes in a 3-ring binder with plastic page protectors. Get another gun, add another page. Works well.
Where do you get the info for disassembly and reassembly? I would love some detailed instructions for educational purposes.
Guessing you’ve never come across the Gunsmithers Pistol Pal by Gunsmither Tools,…
also available on Amazon for 14.99,…
http://www.amazon.com/Gunsmither-Pistol-Pal/dp/B00FJ9TU8K/ref=sr_1_10?ie=UTF8&qid=1419892714&sr=8-10&keywords=tandemkross
ebay: search “all in one tool ruger” 21.95 free shipping.
On eBay:
http://www.ebay.com/itm/THE-ALL-IN-ONE-TOOL-FOR-RUGER-MARK-I-II-III-AND-22-45-PISTOLS-/201177671976
what he said.
+1 for the Speed Strip. I’ll pull the bolt, brush the barrel quick and dump everything into the ultrasonic cleaner. A few minutes later hit it with an air gun and apply a little lube. Perfect!
http://www.eabco.com/Ruger_Mk_III_Speed_Strip.html
Love mine.
Honestly, they’re not that difficult. I certainly won’t be spending $25 for a 100% specialized tool that isn’t required.
Try owning a M14 and tell me what specialized tools you would buy to do a full strip of the rifle. That bolt take down tool is worth it. Same goes for the Bolt tool for a Rem 700.
All you need for the M14 is the buttstock cleaning kit and a spent 30’06 case. The buttstock tool will easily disassemble the bolt, but you better not point the ejector at your face.
The slick way to safely disassemble the bolt is to chamber the spent/empty 30’06 case in your .308/7.62 NATO chamber; it will hold the bolt out of battery with the ejector and spring depressed. Drive the extractor out of the bolt from the underside of the action with a brass punch. Slowly pull back on the op rod and there you have it, a safe and controlled disassembly of your bolt. You can do the same thing with the M1 Garand if you make a longer 30’06 case out of two long halves and a dowel.
Even though I can tear mine down now without any tools, I can see the appeal of the thing.
First time I field stripped mine, I wondered if the designer had a grudge against humanity or something.
Ed Zachary.
http://www.tandemkross.com/Gunsmitherreg-MKIII-and-2245-Pistol-Pal_p_52.html
$14 and does everything this tool does.
People actually clean Ruger .22s?
I just blast it with brake cleaner a few times a year.
I thought they just came from the factory dirty, ran dirty, and stayed dirty.
With about 5000 rounds through mine, I’ve torn it down once. I swore I wouldn’t do it again until it gummed up on me
Now I just hit it with a squirt of brake free, a bit of frog lube on the bolt, and snake the barrel and it keeps running like a clock.
Except when they were fresh from the box, I’ve never actually seen a clean Ruger Mark. In fact, I had no idea that cleaning them was legal. You learn something new every day.
I own a Ruger Mark III, and I love shooting it, while simply detest trying to clean it. The first time I tried cleaning it, I finally had to load up the parts and take it to the gun shop. I’ll check out the tool, but I don’t think it will put me in the Mark III cleaning business.
And I just cleaned mine.
1)Take off the grips….pitch it a bucket of kerosene.
2)Soak overnight.
3)Remove and blow out with an air tool.
4)Thunder Dome!
….actually it isn’t that hard to take them down if you have done it or have been shown one time. People get frustrated with the blind arrangement of the hammer and main spring. Once It clicks in your mind you got it 100%
A tool to field strip a MkI, II or III?
Never needed one.
And I honestly don’t know why people think they’re difficult to tear down or re-assemble. I could strip one to the pins and re-assemble it in, oh, 10 minutes. You want a pisser of a .22 pistol? Try a Buckmark.
“I could strip one to the pins and re-assemble it in, oh, 10 minutes.”- I am not doubting you one bit. But I think you might actually be a wIzard.
No, I’m not.
The first gun I ever really disassembled (a Colt Hammerless) when I was 13 befuddled me on re-assembly for days.
But after you tear down enough guns, most of them start following a pattern. There’s only so many ways to address the issues that need to be solved, and various gun designers/companies start to fall into patterns. Ruger has a pattern, Winchester (in association with JMB) had a pattern, Colt has a pattern, S&W has theirs, etc. JMB’s rifles and pistols follow a pattern.
The secret to disassembling and re-assembling guns quickly is learning how to control springs. If you don’t have to hunt for a spring, detent or some other spring-powered part of a gun that went flying across a room on disassembly, you’re ahead of the game.
Next thing to learn is to lay out your tools and the gun parts in a methodical manner on the bench mat in front of you. The guys who take longer to re-assemble guns have a pile of parts in a pan or box when they’re done. When I finish pulling a gun down, I have the parts laid out in an array around the largest parts in front of me. This way, when I start putting the parts back into the gun, I have a mental schematic already in my head (informed by the layout of the parts) where they need to go back in.
What I do isn’t wizardry and it isn’t magic. You can see people who work on watches & clocks do the exact same thing. You will see diesel engine techs who work on fuel systems do the same sorts of things, as well as people who do board-level electronics repair. There isn’t anything especially unique about guns in this respect…
regardless of your mystical capabilities, i have faith that not much in the world of clockwork mice would leave you scratching your head. more importantly i look forward to your opinions on (spoken like an asthma hound chihuahua) “mechanisms.”
the closing shim on a bevel drive ducati engine requires a valve lash of zero. got that feeler gauge? yeah, you do, but it ain’t in your toolbox, per se.
i bought this for the first disassembly/ familiarization that i will perform since purchase. once i get it, i’ll pass it on to my 22/ 45 pal who will undoubtedly bring everything to his lgs in a box for the second time. or not.
@cmeat
I actually do have a 0.000″ feeler gauge for adjusting Ducati valve closer shims…. i keep it right next to my brass magnet!
remember, you can’t spell education without ‘ducati’. Love the Ren & Stimpy reference.
@dyspeptic
like you said (in so many words) procedural dis-assembly, and lay out, leads to successful re-assembly. +1 on ya!
The problem I always have is getting the barrel aligned with the frame so the takedown pin(?) will go back in. I do wind up swearing quite a bit when attempting that manoever and usually wind up whacking it with a rubber mallet… doesn’t help, but it makes me feel a little better. Once I calm down, it goes back together. I’m guessing all you “It’s really not that difficult…” guys have very ‘broke-in’ Mks and have forgotten how tight they were the first several disassemble/reassemble sessions. I will buy the uni-tasker.
I solved my problems breaking down Ruger .22 pistols
by buying a Beretta Neos. 🙂
+1 on the U22 Neos.
Another solution is the “Speed Strip Kit” from Majestic Arms. I bought one at SHOT Show last year and it works great. http://www.majesticarms.com/id10.html
I’ve got the “idiot” scratches on my stainless Mark III, but really the only tool I need is a rubber/plastic mallet to knock the barrel off/on and tap the mainspring housing back into place at the very end.
I actually regularly tear mine ALL the way down to the last spring. That’s not easy the first few times, and if I don’t do it for a while I forget the appropriate tricks.
Some tips, if you’re willing to do them, is to remove the magazine disconnect (requires a new bushing from Sam Lam, but makes the hammer arrangement MUCH easier to reassemble and eliminates the mag in/out during takedown) and fill the LCI with the Tandemkross piece (less places for grunge to hide).
For the vast majority of Standard/MKI/MKII/MKIII models, you can skip the plastic mallet/hammer for barrel dismount/remount by just pressing the barrel muzzle or frame against a soft wood block, hunk of rubber, thick piece of carpet, or other non-marring object.
For removal, flip the pistol over so it is almost pointing straight up, and place the top/rear of the receiver tube (NOT the rear sight!) on the non-marring surface. Grip the frame and press straight down, and the frame will slide off (pressure needed will vary depending on the pistol, but most slip off with 20-30 pounds of force or less). To re-mount barrel/receiver to grip frame, align the grip onto the receiver, put muzzle against non-marring surface, hold the pieces together with one hand, grab the frame with a firing-type grip with your other hand, and press down; the grip should slide into place with about the same amount of pressure that was needed to remove it.
I just sold mine (mark 2 style 22/45 with blued bull barrel) and went with a sr22. It’s no target pistol, but it is the first reliable da/sa .22lr that I’ve found, and no less than 5 CCW permit tests were aced with this gun, and a few of those were back-to-back.
The mark style gun was a pain to break down. I like shooting guns, not breaking them down and cleaning them. Especially if doing that is more of a chore than it has to be. I started getting ftf and fte malfunctions when the crud started to build up in the mark. Not so with the sr22.
I could not believe that it could be so difficult to field strip the Mark series pistols even after reading all of the wailing and moaning about it. So I bought a Mark III 22/45 just because I enjoy a challenge. The first two times, the gun was tight and required a tap or two with a rubber hammer to separate the frame and barrel assembly. But after that it has been a very simple, uneventful and un-hammer-worthy experience. I strip, clean and reassemble mine after each weekly range trip and actually look forward to it. There are quite a few “really neat” gadgets out there that promise to free you from the horrendous and apparently scary job of field stripping the Mark guns. To me they are all a total and unnecessary waste of money. I will admit to cheating a bit by removing the magazine disconnect “safety” which eliminates a couple of steps. Just practice a bit. A very good YouTube video is “RUGER MARK III FIELDSTRIP (CLOSE UP)” at “https://www.youtube.com/watch?v=opNMCQ_sqwo” (cut and paste this into your browser search bar) that will demonstrate the process and point out the few “tricks” that make living with your pistol easier.
This is pretty much my experience, too. I read all the bitching and moaning about how hard they were to tear down, and decided I had to see what all the fuss was about. The day I got my 22/45, I brought it home, found a step-by-step guide, and had it apart, cleaned, and put back together (with the mag disconnect disabled) in about 30 minutes. The first half-dozen times I had to whale on it with a rubber mallet to get the barrel and grip apart, but now I can usually do it by hand, or with just a light tap from the mallet. It’s really not that complicated.
In any case, it’s a Ruger. It’ll run dirty just fine (and continue to do so for decades) if that’s how you want to roll.
Simply wow….thanks for bringing this product to my attention!!! So many times I “Accidentally” left the mags at home because I secretly didn’t feel like cleaning the darn thing.
I’ve used the the same yellow coated paper clip to pull the mainspring latch lever for… I have no idea how many years. Hoppe’s, bore brush, old toothbrush. Done. Except I haven’t cleaned *anything* since my twins were born unless it was fired with black powder.
For less than half the price, I much prefer the Gunsmither Pistol Pal (gunsmithertools,com). It does all that this tool does, plus it has an extractor removal tool that makes a nearly impossible task into a breeze.
The trick to reassembling these pistols is not punching the bolt stop pin through, and that’s all this thing really does. The tricks are aligning the hammer and hammer strut properly, and aligning the bolt properly. Special tools don’t help with those. And what most folks find toughest is pushing the bolt stop pin past the crescent-shaped end of the guide rod – but that’s easy if you use a punch to push the guide rod out of the way while inserting the pin.
It should also be pointed out, Tyler, that this is also a Loading Tool for Ruger Mks I,II,III and 22/45.
My friend, Steve Wilkinson, a Baptist minister, invented it after his son’s gave him a 22/45 last Christmas and he tried to clean it!
His website crashed this morning, but he tells me he’s working on getting it back up ASAP.
I just use a multi tool.
call my lazy, but anything more complicated then a AK is not a gun I want to own. I am more then happy to trade accuracy for reliability and maintenance. IMO, if I NEED accuracy, a bolt gun will do me just fine. Never had a problem with squirrels so as i needed anything with a high rate of fire.
Yeah that is lazy. Kind of stupid too.
Here’s a very good video on disassembly and reassembly very easy I have no problems , I have the thing done in no time
http://m.youtube.com/watch?v=SkPN87hRgbE
Sent from my iPhone
It’s not that hard… use a paper clip like the ruger video does. It’s not complicated to do if you let the hammer drop properly and swing it the right way so the hammer strut falls into the correct spot. I can pull one apart and back together in 2 minutes or less.
That said I did get the speed strip kit. I wanted to get rid of the mag disconnect. Cautionary tale: I had some problems with my kit. It would not come back into battery. I had to tap the bolt after almost every shot. What ended up being the solution was to turn the screw in pin 180 from what the factory is. Now the shallow groove is back instead of forward. I believe this puts just enough more pressure on the bolt that it goes forward and is flawless now.
SERIOUSLY though the only trick is to drop the hammer after the bolt goes in and make sure the strut falls back to the mainspring.
On one hand, My MkII is a pain in the ass.
On the other, That’s a lot of money for a shaped piece of delrin. $25? That’s like 300 rounds of .22LR.
This is my Ruger Mark story. My Dad had one of these about 1984 or so (I was about 10). We took it to the range and wow could it shoot. I remember putting these little steel animal targets out to 100 yards (the range max) and having no trouble ringing them with just about every single shot. I can remember that day like it was yesterday. I can also remember what happened later that night when Dad cleaned it. My Dad was a trucker and back in those days you had to have a certain degree of mechanical aptitude to work in that profession. Actually my Dad is one of the most mechanicly inclined people I have ever known and to see him struggle so mightily to disassemble and reassemble that gun scarred me for life. Lol. Still to this day I do not own a Ruger Mark series pistol. Maybe this new tool will change that!
I learned the method of reassembling my MK ii’s someone else described above a long time ago and never had much trouble. So, mine got cleaned regularly after range time. However, I ordered one of these tools from Amazon as soon as I saw this article. Looks pretty worthwhile.
The MK’s are great shooters and so much fun. Great for “newbie” shooters to learn with! Mine love CCI Mini Mags and Aguila High Velocity, but not Aguila Interceptors. Shot well but broke the Pivot Link on the Bolt Stop Pin. Fortunately you can get replacement parts from Ruger real easily and inexpensively. Ruger ships very quickly.
They don’t seem to even have their own website, just Flakebook. Apparently not very interested in actually having contact with customers.
great review. thanks.
Totally unnecessary tool.
Comments are closed.