By David Lockman
Let’s face it: ammo can be pretty expensive. Rifle ammo, by its nature, tends to be somewhat more expensive on average than its smaller, pistol-fired brethren—and depending on the caliber and type of ammo in question, it can get very pricey indeed. So the idea of reusing the single most expensive part of a round of ammunition—the brass cartridge case—can make a good deal of sense.
A word of caution, though: you may not save any money overall by reloading. Odds are you’ll wind up spending just as much money as before—if not more—it’s just that you’ll get to do a lot more shooting for the amount you spend—quite literally more bang for your buck.
Of course, reloading rifle ammo has other benefits than mere monetary efficiency. Its main advantage is that it gives you the ability to precisely tailor loads to your particular rifle or needs. Handloading can also allow you to keep shooting an old gun for which ammo is no longer made (assuming, of course, that you already have a supply of spent brass for the obscure caliber in question, or that brass for it can be formed from that of other, currently produced cartridges). And then there’s just the simple satisfaction of making your own ammo.
But, whatever the reason, if you’re reading this, you’re likely either considering taking up rifle reloading, or have already made the decision to do so. In this article, I will be going over the various pieces of equipment involved in reloading, as well as aspects of their use. If you already reload pistol ammo, much of this will be quite familiar, as the majority of the equipment and processes are the same.
That being said, first things first:
Overview
To turn an empty, fired brass case back into live ammo, you must:
- Remove the old primer
- Clean the case
- Rework the case to the proper dimensions
- Insert a new primer
- Charge the case with powder
- Seat and crimp a bullet into the case
The essential metrics of a completed round are:
- Case length
- Powder type and charge weight
- Bullet type and weight
- Overall length of loaded cartridge
Equipment
Before you can do any reloading, you’re going to need to get some reloading equipment. Handloading is one of those hobbies where you can pretty much spend as much money as you want. You could easily spend upwards of a thousand dollars buying all the best and fanciest (though the two are not necessarily synonymous) equipment and gadgets. However, that’s not to say that you have to spend a ton to get into the hobby and do it well—in fact, I wouldn’t recommend it, particularly when starting out.
There are many quality manufacturers of reloading gear—RCBS, Hornady, Lee, Lyman, Redding, etc.—and generally speaking (I’ll cover the major exceptions) you’re free to mix and match as you wish.
Reloading presses
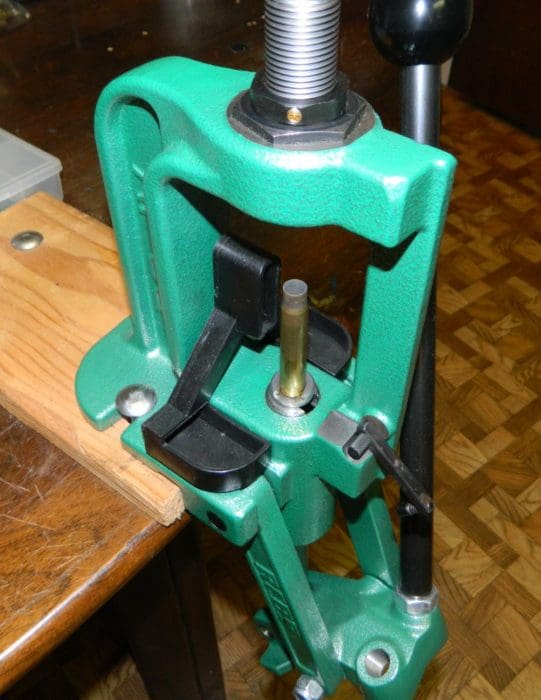
The heart of any reloading setup is the reloading press, the tool with which most of the major reloading operations will be performed. In the simplest terms, the job of a reloading press is to provide the mechanical force to feed a brass case into one of a number of different dies, each of which will perform one or two operations upon it. Reloading presses come in three types: single stage, turret, and progressive.
Single stage reloading presses (such as my RCBS Rock Chucker, above) are both the simplest and the cheapest type available. The name refers to the fact that only a single die can be mounted in the reloading press, and hence only a single stage of the reloading process can be done at a time. Just about every major manufacturer of reloading equipment makes a single stage press, and a good one can be had for under $200 (some can be found for under $100, but I can’t speak as to their quality).
The simplicity of single stage presses makes them great for the beginner; while they are slower than the other varieties, that more deliberate pace also makes it easier to keep track of what you’re doing, and hence safer. Practically speaking, a plain single stage can do pretty much anything you might want a reloading press to do. I’ve been using mine for over four years, and I feel no need for anything fancier.
Turret presses operate very similarly to single stage presses, differing only in the fact that a turret press features a rotating disk (or “turret”) which can mount multiple dies or other equipment (such as powder measures) at the same time—anywhere from four to eight, depending on the model. Turret presses are best used if you only plan to load one or two (or maybe three) calibers, as they allow you to keep all of the dies fitted to the press and set to the right height, so you don’t have to reset them every time you want to reload as you would have to do with a single stage press—saving you time.
Progressive presses are the next step up in speed from turret presses. They are best used if you plan to be loading hundreds of rounds of a single caliber at a time (e.g., if you do a lot of competition shooting). Once configured, a fully kitted-out progressive press can produce a single complete round of ammunition per pull of the lever, allowing you to crank out ammo at a rapid pace. However, the expense of such rigs, as well as the complexity of setting them up, means I would never recommend a progressive press for someone new to reloading.
Along with the press, you’re going to need one or more shell holders. These, as the name might suggest, are used to secure your cartridge cases in the reloading press. As shell holders are based on the rim diameter of the cartridge, one shell holder can potentially be good for a number of different rounds.
For example, an RCBS #3 will work for .243 Winchester, .260 Remington, .30-06, and .450 Bushmaster, among many others. So, depending on what calibers you plan to load for, a single shell holder may serve all your needs, or you may need a different one for each and every caliber (even if it’s the latter, shell holders are thankfully cheap). Shell holders for single stage and turret presses may be interchangeable between brands (though different manufacturers tend to use different numbering systems) but this is nevertheless one area where I would suggest brand consistency. Shell plates for progressive presses are almost never interchangeable between models/brands.
Whatever type of press you choose, because of the amount of force involved in certain steps of the reloading process (particularly resizing cases), all of them are meant to be bolted in place to either a table or workbench—and you’re going to want to pick a solid one (also one you don’t mind drilling holes in). However, other pieces of reloading equipment don’t require such rigid mounting; gear such as powder measures or case trimmers can simply be screwed to blocks of wood, and then secured to the table/bench via c-clamps, allowing for some flexibility in your setup.
Dies, case lube
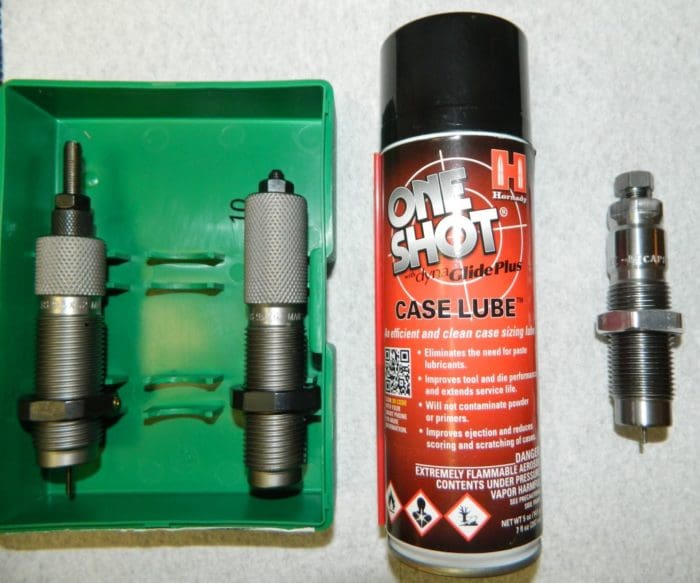
While the reloading press provides the force, it’s the dies where much of the work of turning brass cases back into ammo is actually done. Reloading dies can be had for pretty much any centerfire cartridge ever made; a set of dies for a common caliber will typically be around $40 or so. For bottleneck rifle cartridges, a die set (above, left) will typically consist of two dies: a resizing die, and a bullet seating die. For straight-walled rifle cartridges such as the .45-70, a separate expander die will be added to the mix.
The resizing die, as its name would suggest, squeezes the expanded fired brass case back down to its original dimensions. For bottleneck cartridges, this die will also include an expander ball on the integrated de-capping pin—this serves to slightly expand the case mouth on the reverse stroke, something necessary for easy bullet seating. For straight-walled cartridges, the latter process is performed with a dedicated, separate die.
The bullet seating die is used for seating bullets into the cartridge after it has been primed and charged with powder. These dies often feature removable seating plugs (which are screwed in or out to adjust the seating depth of the bullet) which can be swapped to best match the nose profile of your bullets. Most rifle dies only come with one general-purpose plug, but others are usually available from the manufacturer.
In almost all designs the seating die is also used for crimping the bullet in place. While these dies are designed so that you can set them up to seat and crimp simultaneously, I would not recommend it. In my experience attempting to use this feature both takes more time to set up the die, and more importantly often results in far less consistency in the overall lengths of the produced rounds—and consistency is something you really want, for both accuracy and reliability reasons. My advice is to use the die twice—first to only seat the bullets, and then a second time to crimp them.
Unless you’re dealing with certain unusually oversized cartridges, like the .50 BMG or some of the largest old African hunting rounds, all dies are threaded 7/8’’-14, as are most presses, so you can feel free to mix and match brands if you so choose. (Because of its length, for .50 BMG you would also need a larger press meant specifically for that caliber.)
While it is optional, something I would recommend getting is a universal de-capping die. Though resizing dies incorporate a de-capping function to remove the spent primer from fired brass, it really is best done as a separate process: it is best to de-cap your cases before cleaning them, and to clean them before sizing them, since any grit on the outside of the cases could potentially result in scratching of the brass or even the dies (more on case cleaning in a bit). I use the Lee model (above, right), and am quite satisfied with it, but there are others available.
Something that isn’t optional, though, is case lube. Resizing a brass case—essentially squeezing a piece of metal into a too-small hole—creates quite a lot of friction. Coating your cases with a lubricant serves to reduce the amount of force required for this process, as well as preventing a case from getting stuck in the sizing die (something which can potentially permanently ruin the die).
There are countless varieties of case lube, including liquids, aerosols, waxes, and others besides; most if not all of them will work just fine. I use Hornady’s One-Shot aerosol (above, center) for the simplicity and ease of lubing a batch of cases; but really choosing a case lube comes down to personal preference, nothing more. Whatever you choose, always be sure to sufficiently lube the case neck, and the inside of the case mouth, as these tend to be the areas of greatest friction—you can always wipe off any remaining lube after sizing.
Priming devices
After decapping your spent brass, in order to turn it back into live ammo a new primer must be inserted. This can be done one of two ways:
Most single-stage and turret-type reloading presses include the ability to prime cartridges directly on the press, though the exact mechanism for doing so varies from brand to brand. The advantages of this are that it requires no additional equipment, and it may give a better feel due to the increased leverage of the press arm.
Alternatively, one could use a separate, dedicated hand priming tool. These tools are typically operated by a squeeze-lever, and feature a built-in primer tray which can hold a large number of primers ready at once. The advantage of a hand priming tool is one of speed, as you can prime many rounds in a row without having to manually set up a new primer between each one.
Depending on the maker/model, hand priming tools may use the same shell holders as your reloading press, may have some form of universal shell holder, or may require their own dedicated shell holders.
Powder measure, scale
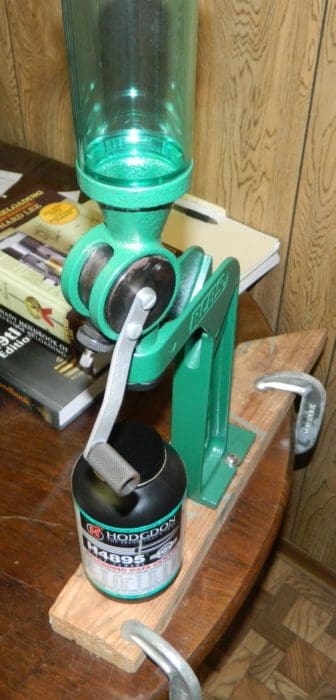
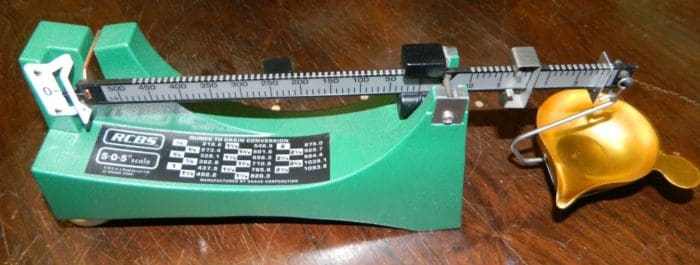
Powder measures are used to accurately dispense powder into your (sized, trimmed, and primed) cases. The vast majority of powder measures on the market are simple volumetric designs—meaning they dispense a charge of powder based on volume, not weight. Since weight is the important metric of the powder charge (and different types of powder have different densities), you will also need a powder scale to ensure that your powder measure is dispensing the proper amount. Scales are available in both balance beam and digital varieties.
To set a powder measure you throw a charge and weigh it, adjusting the measure up or down as appropriate and then throwing and weighing another—repeating this process until you reach the value you desire. Each time you adjust the amount, before actually weighing a charge I would recommend dispensing a few (I usually do four) into your scale’s pan, and then dumping that powder right back into the measure—this helps get the powder measure “settled in” on its new setting.
Also, do note that, no matter how good your powder measure is, the amount of powder it dispenses from charge to charge will never be exactly uniform (and most powder scales are only accurate to +/- a tenth of a grain); what you want is to get your measure dispensing charges that fall in a narrow range roughly centered on your target value. To this end, it is best to weigh a number of charges at a given setting (I do ten) so you can get a good feel for where the average falls.
Case trimmer, de-burring tool
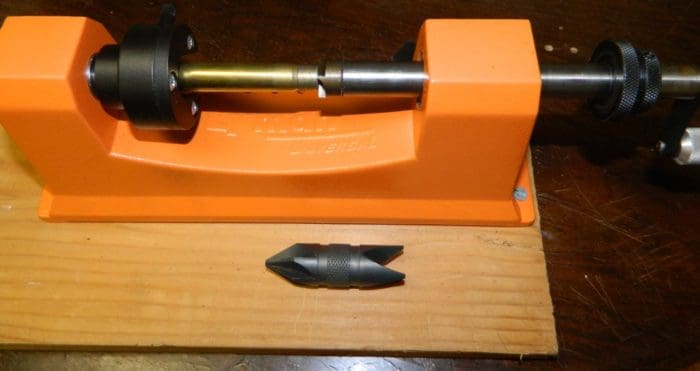
When resizing fired brass cases, the brass you’re squeezing out of the way to return them to their original diameter has to go somewhere—and it does: it flows towards the mouth of the case. As such, cases tend to grow longer with repeated use. In order to keep them short enough to chamber in your firearms, they will have to be trimmed regularly.
Case trimmers come in both hand-powered (above, top) and electric models, although some hand models can also be converted to run off of an electric drill.
To go with the case trimmer, you’re also going to need a de-burring tool (above, bottom) to remove any remaining sharp edges on the inside/outside of the mouths of your freshly trimmed cases. Be careful not to overdo it though, or you could thin out the brass excessively.
Calipers
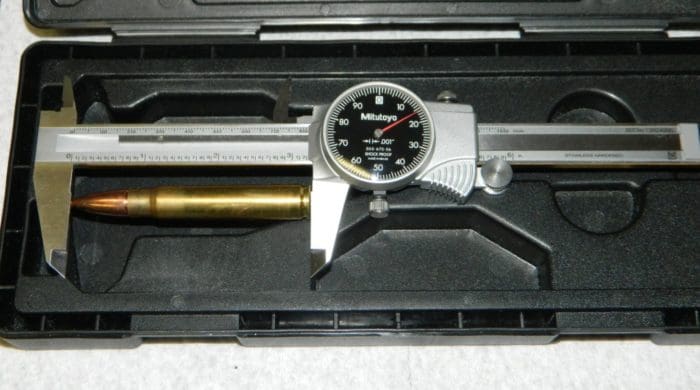
In reloading, precision is paramount. That said, a set of calipers is one of the most important tools you will own. It is also one of the tools you will use the most: to check case length after sizing and/or trimming; to check case mouth diameter after expanding (for straight-walled cartridges); and to check final cartridge overall length after bullet seating/crimping. There are three different types of calipers, differing only in how they display their measurements: vernier, dial, and digital.
Vernier calipers are the simplest and sturdiest variety, however they are also the most difficult to read—as they rely on you being able to judge which pair of marks are perfectly aligned. Dial calipers (above) simplify reading by adding a dial to easily display hundredths and thousandths of an inch. Digital calipers simply give you the entire measurement on a digital display, and even give you the ability to easily switch between English and metric units if you wish; but they are the most fragile and require batteries.
While there are lots of very cheap calipers available, this is one area where I would not recommend skimping; a quality caliper can be had for around $100, and treated properly will last a lifetime.
Reloading manuals
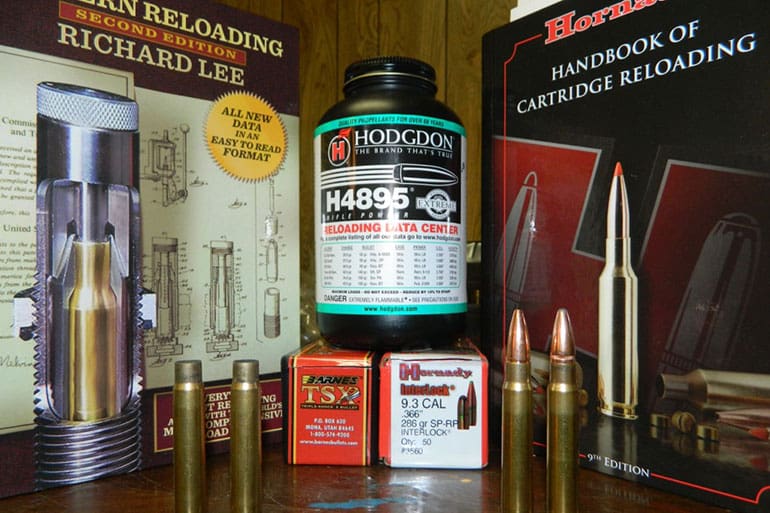
Before you can actually load any ammo you need to know, well, how to load it: how much powder of what type, with what type and weight of bullet seated how deeply into the case. Reloading manuals provide you with this information—to use a cooking analogy, they’re basically your recipe books. They also provide such information as what length cases should be trimmed to, and what size/type of primer to use.
Reloading manuals are typically made by bullet and/or powder manufacturers, and as such many of them tend to be focused on the particular powders/bullets of their maker. While this is great if you happen to really prefer one brand or another, when starting out you might not want to restrict yourself that way. A good general-purpose reloading manual I’d recommend is Lee’s Modern Reloading, which contains data for powders and bullets from a variety of manufacturers, though it may not have some of the most recent calibers. Some manufacturers (such as Hodgdon and Accurate) also post load data on their websites, but I would still recommend getting at least one physical reloading manual.
For any given bullet/powder combination for a caliber, any reloading manual should give you at least two values for the powder charge—one low, and one high. The low value is typically referred to as the “starting” charge, and as its name suggests it is recommended that you start at or at most only a little above that value. From there you can slowly work your way up towards the maximum (generally marked “never exceed”) value until you either reach it or you achieve the power/accuracy you desire; before every increase check for signs of excessive pressure (pierced or heavily flattened primers, bulged cases, etc.) on the fired cases of the previous loading.
Case cleaning gear
As previously mentioned, before you get to sizing and reloading your fired brass, it is best to clean them. The first thing you’re going to want to do after de-capping the brass is to clean the primer pocket, or else the grime that accumulates there can make properly seating a new primer difficult or impossible. Primer pocket cleaning tools are cheap and readily available.
Next comes cleaning the rest of the case. For this purpose there are many dedicated machines available: case tumblers use some solid medium such as crushed walnut shells or steel pins to clean and polish your brass; ultrasonic cleaners use ultrasonic vibrations in concert with a chemical cleaner to perform the same task. While these machines are effective, and can make your brass look almost like new again, they are both expensive and (in my opinion) unnecessary.
The cheapest, simplest way to clean brass requires only two things which you should already possess: warm water, and liquid dish soap. Ten minutes of soaking, followed by careful washing to remove the soap, followed by a day of drying (which could be accelerated with a hair dryer if you’re impatient) gets my cases perfectly clean and usable, if perhaps not the prettiest looking.
Before or after cleaning is also a good time to inspect your cases for any defects: cracks, splits, dents, bulges, etc. indicate that a case should not be used.
Optional: Shell trays, bullet puller, primer pocket reamer
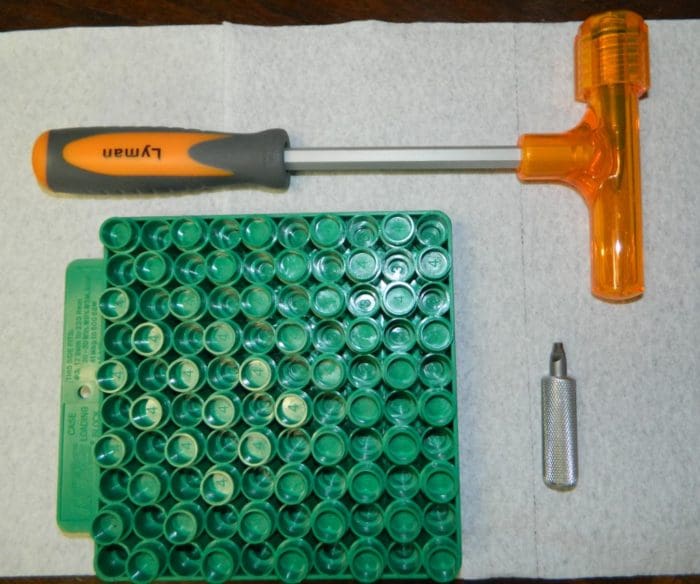
A few last tools you may want, but which are not strictly speaking necessary:
Shell trays (above, bottom left), also called loading blocks, simply serve to hold your cases in a convenient upright position. I like to use two of them, so I can transfer cases from one to the other as I perform an operation on each.
Bullet pullers are used for disassembling a loaded round if you’ve made some mistake, such as seating a bullet too deep (and you probably will make a few mistakes when starting out). There are two common types: Impact bullet pullers (above, top) look like hollow plastic hammers; you simply screw the defective round into the end, and whack the bullet-end of the hammer hard on some solid surface (it may take a few blows), using inertia to drive the bullet from the case. Collet-type bullet pullers screw into your reloading press like any other die, and use the force of the press to pull the bullet; however these need caliber-specific collets which when tightened serve to hold on to the bullet to be pulled.
If you plan to reload brass from military surplus ammo, something you may have to contend with is staked primer pockets, meaning that the brass of the case has been punched in to help hold the primer in place. While this doesn’t typically interfere with de-capping, before you can insert a new primer you’ll have to remove those little brass flanges. A primer pocket reamer (above, bottom right) is a simple hand (or power-drill) operated cutter which serves to trim away the intruding brass, as well as slightly beveling the edge of the primer pocket for easier insertion.
Worksheet
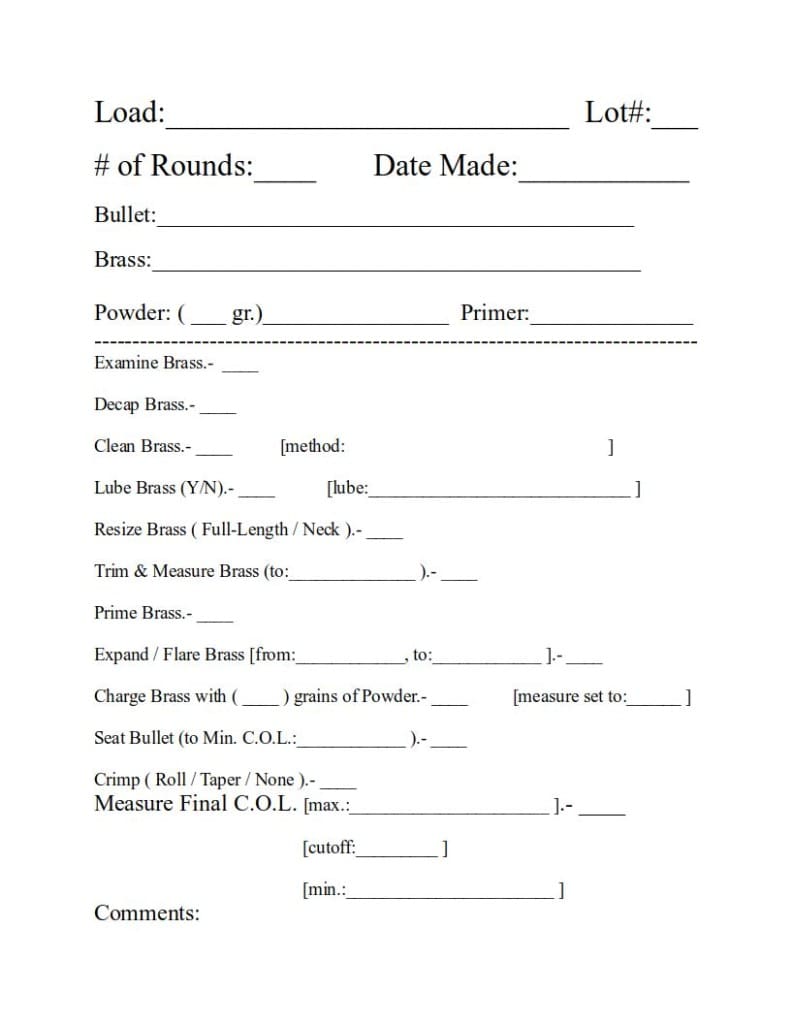
For safety purposes, it is a very good idea to make yourself some sort of checklist or worksheet to use as you go about your loading. The one pictured above is what I came up with: in addition to the checklist, I also record the particular powder weight I’m using (from the range provided in the reloading manual), the exact brand/model of bullet, and the brand of the brass and the number of times it’s previously been fired (important, since brass wears out eventually).
Checking off each step in the reloading process as you perform it not only helps to ensure you do the same thing in the same way every time, but the sheet also gives you a permanent record of exactly what you did when loading any particular batch of ammo; that way, if a batch turns out really well—or really poorly—you can go back and see what you did that might have caused it. Such sheets also make a convenient place to record velocity and accuracy data for your loads.
Conclusion
Hopefully the information in this article will have you well on your way to successfully reloading your own rifle ammo. Reloading does take some time and money to get into, but it can be well worth the effort. So, if it appeals to you, go for it! Have fun—and, most importantly, be safe.
DISCLAIMER: While reloading is a rewarding hobby, done incorrectly it can also be a dangerous one. You are at all times responsible for your own safety, as well as the safety and reliability of any ammo you produce. I would advise always sticking to load data published by reliable sources, and proceeding with the utmost care and attention to detail at all times.


nice thorough write up!
You completely glossed over the horror that case prep really is. LOL
It IS a good write up.
Amen! Case prep takes longer than actual loading.
Prepping a first-time case takes even longer. Had all kinds of primer problems. After reaming the pocket and de-burring the case mouth, no more problems. (On a Lee Loadmaster, the priming station die shears the outside case mouth burr, which then drops that sliver of brass into the primer feeder. Not sure how it works on other presses, but the next 15 minutes is a total waste of time.)
Trimming anyone? Did it for 6 hours a couple days ago. Took an hour to get my eyes uncrossed again.
I mostly use a couple old Lyman power case trimmers and a Forster once in a while on the really big stuff. There are some new, really cool power trimmers now that also debur and chamfer while they trim. Dillon’s had one for some time and there are a couple more universal than those now. Need to look into them. That deburring and chamfering by hand is a crock but necessary.
And another deal with using progressive loaders- if you plan on really doing case prep you need to size/deprime before cleaning and trimming. When reloading you’ll need to run them through the size station again, which on rifle ammo means more lube to clean off again when you’re done. I’ve done it on the Dillons with .308, ’06 and 5.56 where I just leave the sizing die off. No matter what, the case prep takes time and is necessary if you want good stuff. Then there’s neck turning when you’re really looking for accuracy. Yet another stage.
Good article.
The biggest obstacle to “saving money” for a novice to reload (or manufacture from all-new components) will be to zero out the price of buying the initial equipment, data manual(s), and components. I started out doing .30-30 and 12 ga shotgun back around 1975. Separate loaders, of course. Today I’m doing all 4 skeet gauges on 4 different progressive loaders and (I think) 32 metallic cartridges on a couple Dillon 550s and my original Rock Chucker. I have no idea how much I’ve spent on all this but cost is no longer why I reload or manufacture ammo. I enjoy doing it, I shoot a lot, and it is rewarding to be able ro roll my own cartridges that really shoot well. I believe every deer I’ve ever shot, as well as th 2 elk were all killed with reloaded ammo.
Interestingly enough- with the low cost shotgun loads for trap and skeet in 12 ga and sometimes 20, it’s more expensive now to reload than to just go buy the cheap stuff and toss the cases. NBD at 16 yards or skeet.
I have heard that a lot of people get into reloading intending to save money, but end up liking the additional control you have over a load tailored to their guns… and end up spending as much (if not more) in the end.
This is true, well for me anyway. I tend not to nurse my ammo so much knowing I have a bunch of brass at home ready to go, if I had to buy off the shelf what I shoot now would cost me a fortune every year.
What got me started was when my wife bought me a nice 357 magnum rifle for Christmas. Found out that store cartridges are loaded to pistol pressures. Thank you Hornady and Speer.
@Manny A: I think the SAAMI *pressure* for the .357 is the same between rifle and pistols, although a rifle will in theory take a little more than (say) a snub nosed .357. There’s a bunch of discussion on the internet about the old ‘CUP’ (Copper Units Pressure) standard versus the new PSI (Pounds Per Square Inch) which ends up being lighter loads in most cases.
But (if it’s a lever action) you still don’t want to push it too much, since it’s not as strong as a bolt action. In some cases, where the manual lists the .357 in separate “rifle” and “pistol” sections, the rifle section may actually have lower charge weights.
The big benefit is in powder selection, so you get much more velocity out of slower powders (H-110/W296, 300-MP, Lil Gun, 2400, for example.)
And, *very* nice article, David Lockman! Thank you. Reloading techniques and equipment make very good campfire conversation when you’re chatting with a fellow enthusiast, and it’s amazing how much you’ll pick up. (Drives my wife nuts!)
I load .44 Mag for both handguns and a 94 Trapper, W296 in the revolvers, slower powder for the carbine. Nice muzzle blast using the 300 Gr carbine ammo in a Mod 29…
Great article. Why a turret press only good for those reloading for 2-3 calibers? You can reload for as many calibers that you have dies and turrets for and that’s the beauty of the turret option. Set the dies once for each cartridge and they never have to be adjusted again. Can swap between reloading calibers very quickly. A lee deluxe “pistol” turret kit will handle .380 pistol to 30-06 rifle-limiting factor being distance between case holder and turret. I use it for 8 pistol calibers and 2 rifle ones.
Unless your powder throwing technique is spot on, I find it best to set the powder thrower to dispense a charge that is a 0.2 or so grains less and use a trickler to drop individual granules into the pan while it is on the scales.
Die setting. Setting a full-length sizing die requires turning the die in quarter turns until the sized case will chamber with just a touch of resistance at the end of the bolt closing. This stops the brass from being over worked which can split or crack.
For neck-sizing dies I prefer the Lee Collett dies which force the neck into a mandrel instead of over a sizing button. Advantages are longer case life and you don’t have to lubricate the cases. The disadvantage is the cases are set for the gun they were fired in.
Seating die setting. If you only want to load standard, or SAAMI, length cartridges, take a factory cartridge and wind the seating die on to the cartridge. Simple and easy. If you want to seat the bullet on the lands, take a sized case and seat a bullet so it is just in the case. Now chamber the cartridge and the bullet will be forced into the case at the lands depth. Wind the die down onto the cartridge. WARNING! This can increase chamber pressure! You may find a lands depth cartridge won’t fit in your magazine, so keep winding the seating die down in quarter turns until the cartridge fits in the magazine.
“Unless your powder throwing technique is spot on, I find it best to set the powder thrower to dispense a charge that is a 0.2 or so grains less and use a trickler to drop individual granules into the pan while it is on the scales.”
That’s an old analytical chem lab trick, and it’s a good one.
Once you get the ‘hang’ of the dribbling, you can knock out a few hundred an hour that way…
Using this method, I can keep my powder charge tolerances within 0.05 of a grain, while charging and seating a projectile at a rate of more than one per minute.
Most match grade factory ammunition will vary within 0.5 of a grain.
Very thorough article for a new reloader. Thank you.
Rock chucker, RCBS case prep center, RCBS 1500 chargemaster or the new smaller cheaper one, RCBS universal priming tools, one for large and one for small, Lee dies, Sierra Load manual. Its like $20 right now and it will save you hundreds of dollars if you take their advice and duplicate their Accuracy loads.
Nice article. The first step is actually to be honest about your ability to pay attention to detail, keep records and to not let yourself get distracted while reloading. If you can’t do that, you might want to NOT reload. If you can do all that, you’ll have fun.
Nice article, reloading is definitely a fun factor in the shooting world. If you have the patience for it, cost a bit to get started but I don’t regret the investment at all. Love being at the bench after a long week, therapeutic actually.
Don’t kid yourself you will never save money when you reload because when the ammo you load is cheaper you will simply shoot 10 times as much as you would if you were shooting expensive factory stuff. Its human nature. Not that you should not hand load its fun and you can load down when your older to save wear and tear on your shoulder and add years of barrel life to your gun. And if you get ahold of a caliber that is no longer made you can result to advanced handloading where you modify existing cases into obsolete cases. For example: The 8 mm Siamese which was never imported at all into the U.S. but the rifles were. I have made them out of 7.62 Russian for the 8×50 Siamese and 45/70 for the 8×52 Siamese. I have created out of 30-06 cases the 7.65 Argentine, 7.7 Japanese, 7mm Mauser, 8mm Mauser. In the old days before you could get 9mm Largo I made cases for guns chambered for it. There are many, many more obsolete cartridges that can be created so you can shoot those old guns. Ditto for casting your own bullets out of lead in both pistol and rifle for odd ball bored guns.
I have discovered hand loads that were light years more accurate than factory stuff especially in the .220 Swift as well as the 22-250.
I find I am more confident with my handloads as I know if everything is done right with the ammunition my results in competition are purely down to me.
Thank you for this article. Very informative for the novice.
Fine article.
I went directly to a progressive press. Yes, lots of moving parts, but it’s not that complicated. It’s nice to churn out 150 rounds in an hour or two.
Re: bullet puller. The inertial (hammer) puller works better for heavier bullets. 5.56 62-grain not so much. I really like the Hornady collet puller – saves your arm, wrist, and hand if you goof up an entire batch. Yes, it happens.
Re: case lube. Smaller cases (like 5.56) have more surface area compared to their rim size, so they tend to get stuck in the die. Very annoying. I finally settled on a 1:10 mixture of 80W gear oil to iso-heet (isopropyl alcohol). Spritz cases a few times in a ziploc bag, roll them around, spread them out, and allow to dry for an hour. The isopropyl is a merely a carrier. To remove the lube after sizing, I wet-tumble the cases with some laundry detergent. Very shiny brass.
Re: full-length sizing. If the brass stays with the same bolt-action rifle, it merely needs to be neck-sized. Saves the brass from over-work. Bolt-action only.
Have fun!
I have a Hornady collet bullet puller. So much easier (and quicker and quieter) than a kinetic hammer for bulk disassembly.
I can do a hundred rounds an hour with a single-stage press including trickling powder charges. A single-stage is not that slow.
This is the most straightforward intro to reloading I’ve ever seen. Thank you. Usually these are so technical and convoluted that it doesn’t seem worthwhile by the time I’m done with the article.
I really need to get started on reloading — hopefully to save money in the long run (I have a crap-ton of brass from the last few years) and also to be a little more self-sufficient in case our benevolent progressive overlords go full retard and panic buying starts again.
I say go for it, I was collecting brass for a long time and researched loading for a year before getting a single stage kit. Eventually building off of it as I got more experience, digital scale, quick change conversions etc. Once you get a good setup going, you’d be surprised how much rounds a single stage will pump out. OH! And a good STURDY bench, wobbly equipment are more headaches than their worth.
Reloading is going to be a big thing in areas that tax , restrict regulate and document ammo sales. I sold off my reloading for rifle calibers I didn’t own Ang longer and all the buyers were in California. That’s interesting right there. Having the ability to cast bullets is a plus as lead is abundant.
Powder and primers keep for a while if properly stored. At this moment the antis haven’t zeroed in on components.
For case lube I use liquid lanolin and 99% isopropyl alcohol in a cheap spray bottle. There are a variety of mixture suggestions out there but I use 10 to 1 (1 lanolin).
I layout the brass on it’s side in an old cardboard box spray then let set to evaporate. A box with a smooth finish like left over packaging works well because the image side is sealed and smooth. Just turn the box inside out. I then roll them around a bit to spread it around.
The lube makes rifle brass processing much easier even with carbide dies. It’s not necessarily required for pistol brass but lube makes the sizing nice and smooth. I don’t clean it off after but you can if you like.
I save a lot reloading 300 BLK. I can make subs for ~$0.15 each with coated lead bullets. That does not include the cases because I make them from left over .223/5.56 brass.
For everything else reloading lets me shoot more for the same dollar. I do tune loads for different guns also.
Nice. Would love to get into this someday.
It’s great that you could reuse spent hunting ammo as live ones by investing in reloading kits. My brother is interested in purchasing a firearm that’ll help him start hunting deer as a new hobby. I will recommend that he look into reloading so that he could save money or use them for emergencies.
In these times of various scarcities, reloading can be a godsend. True, single stage and progressive loaders are fast, but hand loaders such as made by Lee will get the job done with the addition of a few items such as a powder scale and hand trimmer. So unless you plan on shooting hundreds of rounds at a time, or even if you’re tight on cash or even workspace, it’s a great way to get started. Only downside it that they only come in common calibers.
It’s great that you talked about how the main advantage of reloading rifle ammo is that it would give you the ability to precisely tailor loads to your particular rifle or needs. I have some rifles and the bullets I usually buy do not fit every one of them. Reloading my own ammo sounds like a good idea, so I’ll buy some .223/5.56 once fired brass later.
Comments are closed.