The Mosin Nagant 91/30 is an historic artifact, and a fun shooter. Inspecting the rifle, checking the headspace and firing pin depth, and removing cosmoline were covered in Parts 1 and 2. Now it’s time to tune it up. Some owners have lugged this heavyweight rifle to the range, only to discover that their 91/30 couldn’t put a round in a rain barrel at 100 feet. That’s when they start to tear the gun apart or beat it like a redheaded mule. Don’t! With just a little effort, it’s possible to wring out some extra performance from a 91/30 and make it a nice shooter . . .
A garden-variety 91/30 is not a target rifle, but it is capable of 3-4 MOA accuracy with its iron sights. So owners should be prepared to fix what ails their Mosin Nagant rifle. It’s easy. It’s part of the fun. Best of all, the rifle’s performance can be completely upgraded while leaving just about everything close to as-is.
Why is the rifle not performing? It’s probably not so much the gun as it is the set-up.
Although some 91/30s were sighted in at 100 meters, most were zeroed at the factory or arsenal for the expected battle distance of 300 meters. Sometimes 91/30s were zeroed with the pig-sticker bayonet attached, and sometimes they weren’t. Sometimes they were sighted in with light ball ammo, and sometimes they weren’t. This “is it live, or is it Memorex” system causes a lot of today’s accuracy problems with the 91/30.
We won’t be shooting our Mosins with the bayonet, and that’s issue number one. Removing the bayonet alters barrel harmonics enough so that the point of impact can vary significantly from the point of aim when the rifle is fired without it. If a 91/30 was zeroed at 300 meters with the bayonet attached, it will shoot very high at 100-200 yards without it (91/30s rarely shoot low), and it will probably shoot to one side or another, most often to the left. Both elevation and windage issues can be remedied without difficulty.
The first step, naturally, is to establish where the 91/30 is actually printing. If it’s shooting high-left or -right, then both windage and elevation will need to be adjusted. But please, resist the temptation “solve” the windage issue by attaching the bayonet. The bayonet is a bitch to attach. Removing it is harder than performing a field colonoscopy on a rabid honey badger in heat, and will mar the bluing. Moreover, the 91/30 is already long for a .30 caliber-class long gun. Attaching the bayonet lengthens the rifle by about a foot and a half, making it longer than an ex-wife’s memory. So, be smart and leave the bayonet in a closet and don’t attach it to the rifle.
Just adjust the sights. Remember the acronym FORS, which stands for “Front Opposite, Rear Same.” Drifting the front sight in the opposite direction of where the rounds should go will solve the windage problem. So, let’s get drifting.
When I can, I like to use a laser boresight before I go to the range, just to get a vague idea of how the sights are set up. There’s no point in changing something just to make things worse. I’d rather not do a lot of math and scientific voodoo when I sight in. I may use a few extra rounds, but who cares? Milsurp 7.62x54R ammo is cheap.
There is a very rough equation for the amount of adjustment required to drift the sight. It’s very rough because it doesn’t take spindrift, wind, the earth’s rotation, the tides, the Zodiac or anything else into consideration. The equation is A = (B x C) / D, where A is the distance to drift the sight (which is what we’re solving for), B is the distance off the target, C is the sight radius (using 24” for this example) and D is the distance to the target. All measurements must be in the same units – inches, feet, meters, arshins, baby steps or light-years, it makes no difference.
Let’s say that the rifle is shooting a whole foot left at 300 feet. The equation is A” = (12” x 24”) / 3600”, and the rough solution would be .08” (that’s about 1 ¼ sixteenths of an inch). Look at a ruler. It’s not a lot of drifting.
Adjusting the front sight for windage is a piece of торт. That’s “cake” in English; in German, it would be “strudel.” The front sight can be drifted the sophisticated and expensive American way or the clumsy and cheap Russian way. The American way requires the purchase of a sight adjustment tool or pusher specifically made for front rifle sights. The clever U-shaped device fits under the barrel of a pistol or rifle and cradles the sights. Turning a screw drifts the front sight incrementally in either direction, and the sight can be dialed in with pretty good precision. The cost of a sight tool for the MN 91/30 will range from $20 to $400, if one can be found. Good luck with that.
The unsophisticated Russian way requires the use of a hammer and sickle. Excuse me, I meant a hammer and a punch. You already have those, so they don’t cost a single additional kopek. You also know where to find them, right in the bottom of your tool box. If they’re not in the bottom of the box, you may have foolishly loaned them to your best friend, so don’t forget to look in the bottom of his tool box.
Place a small eraser or wood shim under the sight, which makes this imprecise method a bit more precise and less likely to damage the bluing or the desk you’re using for a backstop. Then, use the hammer and punch to persuade the sight to move in the correct direction, keeping FORS in mind. It won’t need a lot of drift, so tap the sight instead of pounding the crap out of it. Once the sight gets to moving, it moves fast. The sight will overshoot the runway, and it will take a bit of time and a few extra rounds fired to really dial in the windage, tap-tap-tapping the sight to and fro until it’s just right. At the end of the drifting process, the windage will be dialed in and the 91/30 should be shooting straight down the middle, not wide left or right. It will still be shooting high, but that will also be fixed. In fact, taking care of the elevation issue is actually easier than drifting the front sight.
The reason the rifle is shooting high relates to the 7.62x54R round. Ballistics for that hefty Russian sledgehammer depend on bullet weight, powder charge, factory of origin, country of origin, the bore diameter of the rifle in question (they do vary) and a host of additional variables. I’ll leave the science of it to Nick Leghorn because he likes that kind of stuff and he’s really good at it. I was a Liberal Arts major, so math is not my strong suit.
I have ballistic charts for the 7.62 x 54R as well as most other rifle rounds. The charts say that, as a rule of thumb, the 7.62 x 54R has a bullet arc of at least eight to twelve inches or more at 300 meters. It should now be obvious why the 91/30 shoots so high at 100 meters. It’s because that’s the way they were set up to shoot.
MN rifles that were battle-zeroed at 300 meters (about 328 yards) took into account the sizeable bullet drop from muzzle to target at that distance. At 100 yards, though, the bullet is still rising from the muzzle, impacting high by an inch or two. Add that 2 inch rise to the 8 to 12 inches of drop already built into the 300-yard zero, and the MN hits not just high at 100 yards, but embarrassingly high. Like a foot or more high. Like Lindsay Lohan high. I’m talking high.
Russian soldiers were taught to overcome that problem by adjusting their point of aim to compensate. They weren’t just good at it, they were masters at it. Then again, the soldiers were trying to put a bullet anywhere into a man-sized man, rather than dropping a round with surgical precision into a target area smaller in circumference than the base of a shot glass.
Most shooters know about “holding over.” That’s the way I was taught to shoot, way back before mil-dot reticles. Holding over is very natural, a lot like throwing a ball. The ball starts out high and drops, just like a bullet will drop over distance. With a little bit of practice, the computer that lurks between human ears dopes out the solution. Most people, given a little practice, should be able throw a ball close to a target. The same goes for shooting high and anticipating the bullet drop.
But holding under is a whole different ball game. It’s so counter-intuitive that it’s wickedly difficult to do. Holding under by more than a foot – a foot! – to hit a typical range target totally disrupts the sight picture and makes any kind of accuracy problematic, if not impossible. Making a vital hit on a deer would be extraordinarily difficult with a 12 inch under-hold. Making such a hit on a pig or other animal built lower to the ground would be out of the question, since the shooter would then be aiming at the point on the ground – which is a never-ending plane — and not the target.
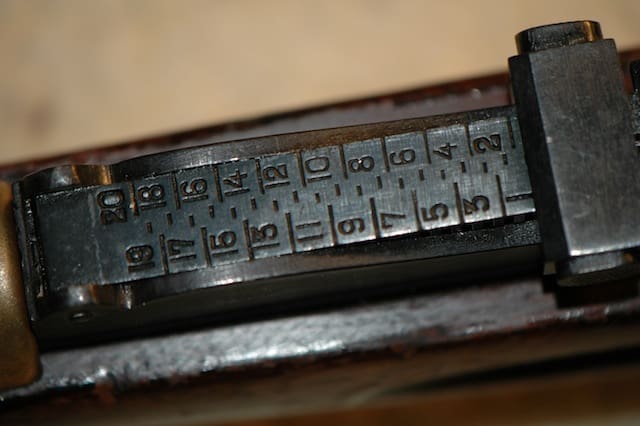
In theory, elevation can be changed with the 91/30’s rear sight. It’s a great theory, but it doesn’t bear close scrutiny. Rear sight adjustment on the 91/30 is simply too coarse to zero-in at close distances, and a crapshoot to dial in at longer distances. It’s amusing and bewildering to me that elevation on a 91/30 rear sight can be adjusted out to 2000 meters. It might be possible for an exceptionally well-trained marksman to place a round at 2000 meters into a target the size of, say, the battleship Bismarck. Maybe. On a good day. But the odds of hitting a human-sized target at .50 caliber sniper distance with this rifle and its standard iron sights are off the board. It’s the kind of sucker bet that built Las Vegas. Even the brilliant WW2 Russian snipers couldn’t do it.
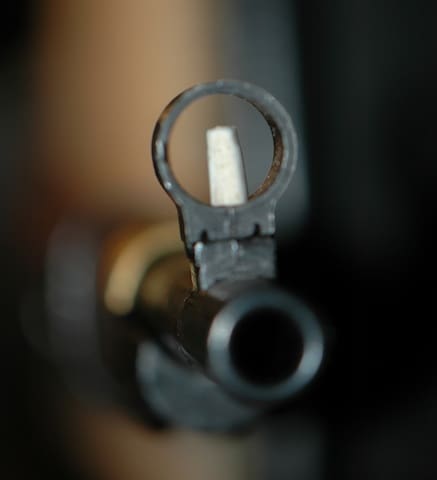
Back to the issue at hand. For rifles shooting way high at 100 meters, lowering the rear elevation won’t pay off. It’s the hooded front sight that needs to be adjusted. Raising the front sight lowers the point of impact, putting the rounds where they belong. The equation we used for windage works for elevation, too. To lower the point of impact by a foot at 100 yards, the sight needs to be raised (Front Opposite) by about .08”.
There are two ways to do this. There’s the American way and there’s the Russian way.
The American way requires removing the front sight, knocking out the old sight post and replacing it with a longer one machined from . . . oh what the hell, we’re not going to do anything like that. It’s too much like work.
Here’s the Russian-style quick fix, and it works great. Strip about a half-inch of insulation from a single strand of wire, such as 16-gauge lamp cord. Make sure the cut is clean and straight at both ends. Any color that stands out for the shooter will work just fine. I’ve used white and green and they both work fine. The insulation is going to be the new sight, and will be fitted tightly over the original sight post, which will not be removed.
It’s likely that the channel inside the insulation will have to be temporarily enlarged to fit over the sight post. A pointed tool like cleaning pick, ice pick or nail will do the job. Work the tool into the channel slowly until the channel is stretched out a bit, then remove the tool. Slide the insulation over the sight post. The insulation has a memory, and the channel will tighten around the post and fit very snugly. Once slipped over the sight post, the insulation will not come off by accident, and recoil will not shake it loose. However, the insulation can be easily moved or removed with fingers or a pair of needle-nose pliers.
Start zeroing with the new sight set too high, but not so high that it touches the hood. The insulation is thick and will completely cover the target, so take a six o’clock hold. A practice shot will reveal where the rifle is printing, and it may be too low. That’s fine. That can be fixed either by lowering the new sight by forcing it further down onto the sight post, by snipping a tiny bit off the tip of the insulation with scissors or an X-ACTO, or by sanding it down. While zeroing the front sight in this manner, keep the rear sight set to the closest matching mark. If the rifle is being zeroed at 100 yards, the rear sight should be set at 100 meters. The 91/30 should be on target in just a few rounds.
But as the man said, “wait, there’s more.”
Once the sight is completely zeroed at the selected distance, you may wish to dab a bit of glow paint, sight paint or nail polish at the tip to add contrast and facilitate target acquisition. A permanent marker like a Sharpie in a high-contrast color does a good job, too. Use whatever works for you to get the high-visibility you’re looking for. Yellow works great; red is bad for bullseye shooting because the color will bleed into the bullseye.
Now here’s another sneaky little trick. Add a second small dot of paint on the insulation to mark the top of the original sight post. If you can’t see the small bulge that marks the tip of the post, you’ll easily feel it through the insulation. Having two dots creates a double zero, the top one at the new distance and the lower one at the original battle zero when the rear elevation is set to 300 meters. When using the lower zero, a six o’clock hold won’t work because the top of the insulation will be obscuring the target. Instead, the little dot of paint should cover the target. It takes a bit of practice but works great. Confirm both zeroes at the range before taking the rifle into the field.
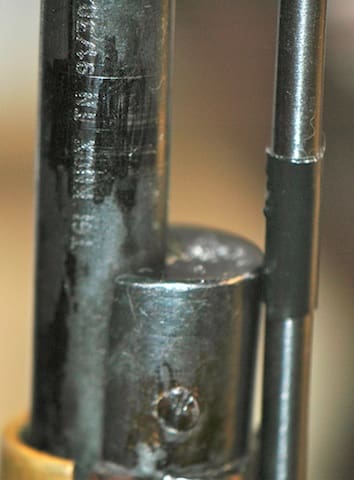
The sights are zeroed, but we’re not done. We need to check the cleaning rod. Screw it down as hard as you want, and then shake the rod. Guaranteed, it’s loose. They all are. It wiggles, it vibrates, it may be slapping the nose cap when the rifle is fired, and might throw off a shot by just enough to be really annoying. Rather than removing the cleaning rod for shooting and taking a chance on damaging or losing it, leave it in place. Throw a few turns of black plastic gaffer’s tape around the cleaning rod where it meets the nose cap dampen the vibration. Now the cleaning rod won’t rattle or vibrate. The tape will not affect the rod’s cleaning function, and the black tape is unnoticeable. Gaffer’s tape is readily removable, so once again the rifle has not been permanently altered.
The 91/30 should now be accurate enough at both 100 yards and 300 meters. If it isn’t, there’s one more thing that might be done to wring out the last bit of accuracy from the rifle while keeping it as-found. The barrel can be floated.
Some people believe that 91/30 can’t be floated because it has a hand guard cover and barrel bands. They are incorrect. Not only can the barrel be floated, but it might already have been floated by the arsenal, by the factory or in the field. Many Finnish M39 Nagants had floated barrels, and it may be that Russian armorers or even soldiers caught on and did the same to their 91/30s. Maybe it was the other way around and the Finns learned this from the Russians. Who knows. Whatever the true story might be, the fact remains that floating a 91/30 barrel is easier than you’d think and some of them come that way when they’re purchased.
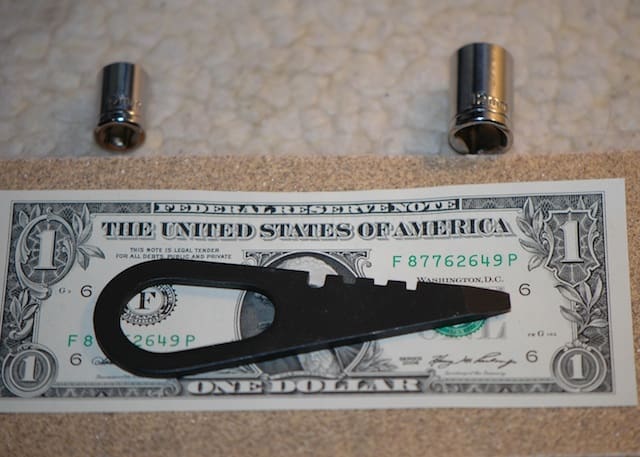
Here’s the complicated field kit needed to float the barrel: the MN teardrop tool or a screwdriver, some sandpaper, a couple of sockets in 10mm and 12mm, and a crisp, new bill.
The process starts with field stripping, which is about as intellectually and physically challenging as removing the cap from a tube of toothpaste. First, if the 91/30 has its sling attached, remove the front dog collar. The rear can be left in place. Unscrew the cleaning rod and set it aside. Next, there are retaining springs underneath the barrel bands that keep the bands in place. Depress the springs using thumb pressure or the MN teardrop tool, and the barrel bands can be walked forward until they clear the hand guard cover.
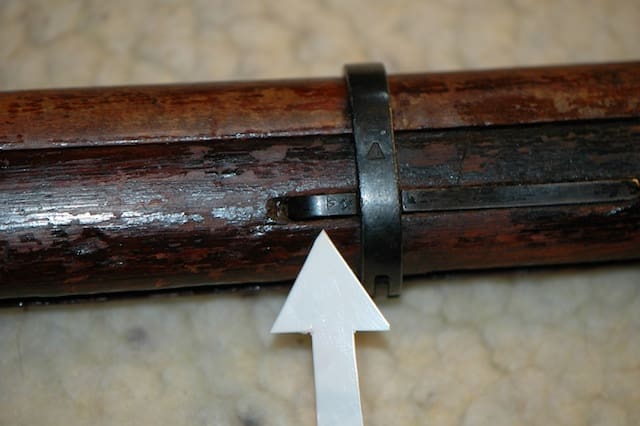 Once the bands are out of the way, the hand guard cover simply lifts off. Check it for cracks. If it’s in good shape, set it aside and leave it alone. A quality replacement will cost about $20, which is a lot of money for a single part on a $100 rifle.
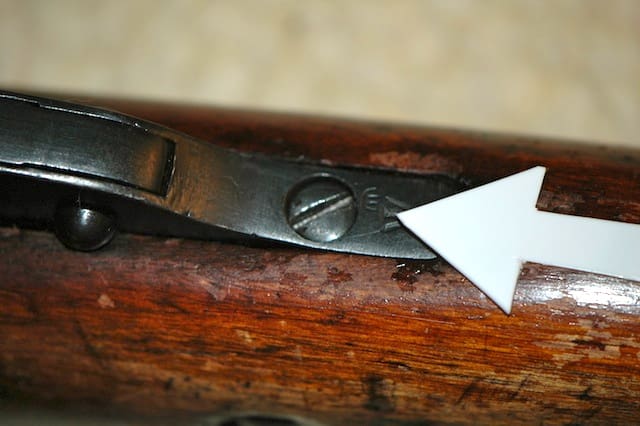
The whole Mosin shooting match is held together by two tang screws. One screw is on the top toward the rear of the receiver.
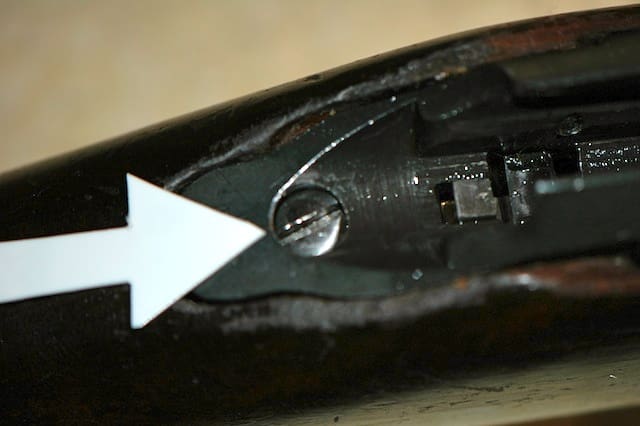 The second screw is in the front of the magazine.
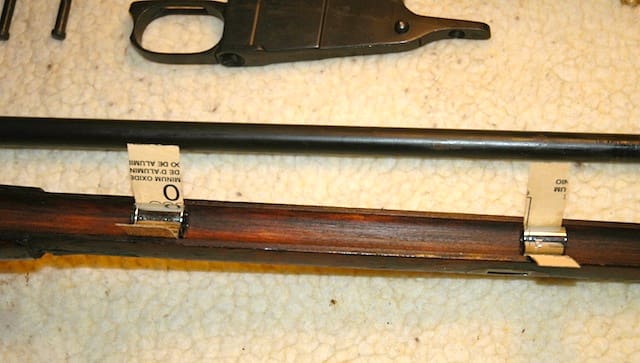
Back off both screws a little, but don’t remove them. The end of the stock, like the end of the hand guard cover, is protected by a metal nose cap. The purpose of loosening the screws is to create a gap so that a crisp dollar bill can be inserted past the nose cap, between the stock and the barrel. You may also use unwaxed, flavored dental floss, which leaves the stock plaque free and tasting all minty fresh.
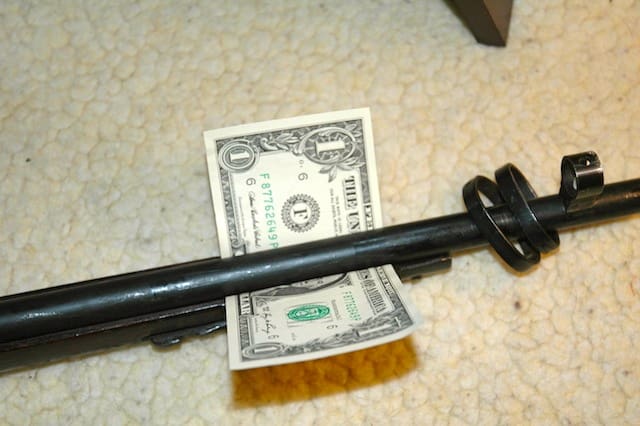 Once the bill has been inserted, re-tighten the screws. Running the bill along the entire length of the stock, it should travel without hanging up. Wherever the buck stops, that’s where the stock is pressing against the barrel. Mark any such locations on the stock. A soft lead pencil or a White-Out pen works fine for making witness marks, and they’ll come off easily. There may be more than one high spot, or there may be none. If there are none, just reassemble the rifle and go shoot the beast. If there’s one or more, go on to the next step. While the nose cap shouldn’t touch the barrel, leave it alone even if it does. It can’t be helped.
To float the barrel, completely remove those two tang screws. They are the only things that hold the magazine and the barrel in place. 91/30s may have shims at the tang and recoil lug. Don’t lose the shims. Note their locations and use witness marks to aid in repositioning them.
Remove the screws, the barrel and the magazine and set all the parts aside. Don’t lose the screws. The rifle is now field stripped. Use this opportunity to check for hidden dirt, carbon or cosmoline, because the sticky crud gets into everything. Remove any crap with the proper tools, patches and cleaners. Check the interior of the stock for warping and cracks. Bad or damaged wood can be the cause of pressure in the barrel. Bad wood might be irreparable, but replacement stocks – synthetic or original — can be purchased.
If the stock is in good shape, the barrel can be floated. Gritty sandpaper wrapped around a properly the sockets from your socket wrench set will do the job. Test fit each socket to be sure it fits in the channel correctly. Note that the barrel is tapered, and so is the channel that will be sanded. Because the channel is more funnel than tunnel, you’ll need more than one sized socket.
The purpose of sanding is to remove high points and smooth the channel ever so slightly, not to cut a new channel. Gently sand the high points of the wood in the area indicated by the witness marks. Work slowly and accurately. It’s not a race. Take plenty of time and don’t remove any more wood than is absolutely necessary. You may find that the wood is fine and that the high points are cosmo deposits that are still leaching out of the wood. Sand them away. There also may be a high seam anywhere that two pieces of wood join. Sanding will smooth those out in no time.
Recheck the work by replacing the barrel and mag assembly, re-tightening both screws and repeating the dollar bill test. Once the rifle passes the dollar test, pocket your money and finish the job by wiping away or vacuuming up any sawdust. Check for splinters or unnecessary roughness. If you don’t like the way the wood feels, used a finer grit of sandpaper to polish it. A tack cloth is useful but not critical for removing the last vestiges of dust.
To reassemble the rifle, re-insert the barrel and magazine assemblies into the stock. They interlace, so do this carefully. Don’t worry, it’s strudel. Turn the two tang screws a few times to get the barrel and magazine properly aligned, then screw both down tightly, alternating between the two screws for even tension. A word of advice — after shooting the rifle, check the screws as they can loosen, which will cause a 91/30 to start throwing rounds all over the place. If the accuracy of a dialed-in 91/30 suddenly goes all to crap, the screws should be the first things that get checked, especially the top tang screw.
If you’re wondering whether or not to use Loctite on the screws, I don’t encourage it. My concern is that the Loctite might end up somewhere that I don’t want it to be. Should you feel otherwise, go ahead and experiment.
Reposition the hand guard cover and slide the barrel bands into their proper positions. The barrel bands will now clamp the hand guard cover to the stock, forming a two-piece wooden tube. The barrel will float inside that tube. That’s it. That’s all anyone needs to do. Торт, da? While it’s true that the whole business can be bedded, there’s not much reason to do that and besides, the purpose of this exercise is to avoid permanent alterations. Floating the barrel is not an alteration, it’s a restoration. There’s a difference.
[Click here for Part 1]
[Click here for Part 2]
[Click here to read Chris Dumm’s review of the Mosin Nagant]




great write up Ralph, impressive. My only concern with mosin’s are their abundance of little parts to loose.
Is there a rifle with no little parts? If there is, I want one!
The mosin really only has about 3-8 small parts. Only one part can fall out doing a routine field strip.
This is awesome. Time to go to the gun store!
Thanks for the write up, Ralph. I’m not sure why, but I have 10 of these rifles (I guess its because it was hard to say “no” when they were $75 at Joes and Big 5 a few years ago). But I have only shot one of them. I had a chance to buy one that said “CCCP” on the reciver but I passed on it and now I regret it.
91/30s are like pistachios. I’m going to add a few more to my collection, and I may bubba them up a little just for kicks.
Ralph,
Does ‘corking’ the barrel serve the same function as floating it in the way you describe? It seems to, by making sure that the barrel only touches the wood at the very front end.
Chris, it’s almost the opposite of floating, but it has the same purpose. Floating the barrel relieves all the stress points from the stock. “Corking the barrel” involves using a shim to lift the barrel off the stock, which may also dampen barrel harmonics. If you have an inaccurate 91/30 with a good bore, you can shim it first (because it’s a reversible process) to see if that helps. If not, float it, which takes all of 10 minutes. If that doesn’t work, bed it, which is a bigger job. The 91/30 in this article shoots about 2 MOA now with the stock sights when I’m having a good day; before, it shot maybe a few minutes of barn door.
My FFL will be getting some $99.00 91/30s soon (he sold out the last batch of round receiver MNs before I could get there), and I’m going to buy a couple of good ones for project rifles. I’ll experiment with new stocks, different sights and maybe a Timney or Huber trigger. The trigger job isn’t all that easy since it they’re not drop-ins. My goal will be challenge: 1 MOA at 100 yards.
Or you could just try my friends and me… Just sayin’…
You’re on, Josh. I’ll use your sights on one of my project guns. It should be really exciting!
Great info! I need to find something similar for WWI era 30-06 rifles?
For the Springfield 1903?
The rifle handed down to me from my dad is a 1917 Eddystone which I believe is a Springfield clone. I know little about it. Very heavy, very crude looking and shot a 1.5 inch group (3 shots) at 50 yds with 1942 ammo. Anyway, it deserves some love just for lasting nearly 100 years.
Actually it’s an Enfield derivitive and the same pattern used by Sgt. York! Our Army got caught with it’s pants down at the start of WW1 and needed rifles. Instead of making more Springfield 1903s, some smart guys figured out that by adapting the .303 British SMLE to .30-06, they could make the rifles faster than the Springfields. They were right. I believe that the rifle was made for only two years. I think that Eddysone was an affiliate of Remington.
Eric, that’s a nice, historic and accurate WW1 battle rifle you have there. The .30-06 is a great caliber that’s readily available and relatively inexpensive. Enjoy your rifle!
Here is a link to part two and I recommend a link be added at the end of this article as the series is great.
http://thetruthaboutguns.com/2011/03/ralph/ralph%E2%80%99s-guide-to-buying-your-first-mosin-nagant-9130-pt-2/
Great write-up. I just got a M91/30 a week or so ago and too it out to the range today for the first time. Put about 60 rounds through it. Shoot a good 8″ high and 3-4″ to the right at 100 yards. I hope to get it zeroed using your methods!
Chris, if your 91/30 is shooting 8″ high and 3-4″ inches right consistently, you have a good rifle and will zero it quickly. If the rifle is sending rounds all over the place, check the screws first.
I don’t understand the draw of this gun. What do fans see in it? Truly curious, not trolling.
To understand the attraction of the Nagant is to understand the history of the European theatre of operations in WWII.
Germany was not defeated at Normandy, the Falaise Gap or the Ardennes in the Battle of the Bulge. Germany was mercilessly ground to pieces on the Steppes, on the banks of the Volga, the Don, at Stalingrad, Lennigrad and Kursk.This is by no means a slight to the contributions of the 500,000 or so casualites suffered by the western allies (US, UK , Canada and various countries) – but the casualties suffered at Stalingrad or the seige at Lenningrad alone surpasse the total US casualty count for the war. Ivan, the simple peasant Soviet consript paid the vast majority of the butcher’s bill to defeat Hitler. And the Nagant is an iconic symbol of this struggle against Germany.
The Nagant, like the Garand which symbolizes the technical faith of its creators, epitomizes the struggle of Ivan during the “Great Patriotic War against Fascism”Soviet technology like the Nagant, often foolishly derided in the west, was brutally simple and effective in concept and operation when fielded by an army of conscript peaseants who often had little to no education or experience with technology. Like Stalin once said about his armies and the technology that was grinding away the Werchmact, “Quantity has a quality all of its own.”Like Ivan, the common simple Soviet conscript, the Nagant was indefatigable.
The war that was fought on the Western front was “Total War” with merciless bombing of civilians, artillery barrages and all the terrible wages of war.
But the war on the Eastern front was something beyond that, a widespread “War of Annihilation” where two civilizations brutally sought to exterminate each other, beyond anything seen by the western allies, only closely approached by the war waged between the US and the Japanese.Where else can you own a piece of history that tells such stories of struggle and sacrifice for only $79.95? I’ve always been a huge fan of history, but I started collecting rifles late in life, and my first Garand, a 43′ springfield cost me over 500 bucks. I have several Nagants, 91-30s and M44s and love looking through the racks to grab nice ones with interesting marks or ex-snipers- stilling looking for a nice M38, wish I had bought one about 3-4 years ago when they were giving them away.
Stan, fan of the brutally simple Mosin Nagant.
Ralph, enjoyed your writeup. Nice simple and too the point for the beginning Nagant collector.
i am thinking of getting a mosin. this was very good info
Good series of articles. One comment I’d make is to put links to parts I and II in here, and vice versa the other articles. It would make navigation much easier.
Awesome write up on the 91/30. I just received one for christmas. It’s my first rifle and I’ll never need another… I’m in love with her. HOWEVER…. There’s something very strange between mine and everyone else’s, it’s dead on at 100 yrds as well as at 150 yrds. I don’t currently posses the funds to purchase a scope and bolt package, and a buddy is taking me down to shoot hogs. He said I need to be able to shoot up to 340 yrds. I know I see that far and aim just fine. I also know that the 7.62×54 SP will do plenty of heart stopping action at that range. What I don’t know is how to get the round there. I wanna use the rear site and dial it in to 400m and just aim and shoot. Is it that simple? OR, Do I keep my elevation on 150-200m and shoot straight. Basically I’m not sure of the bullet drop @ or around 300 yrds. I don’t have a place to sight in at before the hunt and I don’t want to learn by missing allot first.
I should be getting my overpriced sophisticated imperialist American front sight adjustment tool in the mail by the middle of next week, so I’ll be able to put this info to good use in sighting in my new Mosin! Just picked it up a few weeks back and haven’t had a chance to even do something as basic as that. I still remember when I picked this little beauty up….the clerk at the gun counter of my local big 5 had to pick his jaw up off of the floor when he cracked open the box of what he assumed was a wartime production 91/30 only to find a 1934 hex model with a pristine finish and excellent rifling down the bore. Oh, and to give everyone a little tidbit of info about why in the hell these things have rear leaf sights measured out to 2000 metres (laughable, I know) it all has to do with an old throwback in military tactics that the Ruskies used to use back in the day; they’d get together a big ass group of a hundred of more soldiers and have them adjust their sights out to the 2000 metre mark, aim roughly at the same target and just start firing in hopes that somebody’ll actually hit something. It didn’t usually work too well, but evidently it did it’s job well enough that they didn’t change the sights, so there must be something to the practice…..
Hi Ralph,
Great article. I just got a MN 91/30 for a wedding present and took it to the range for the first time last night. It was shooting embarrassingly high like you stated so I’ll try to adjust the front sight.
What I am not sure about is can I change to the bolt so I can put a scope on it? I know one model comes with it but is it easy to change if I have the standard one?
Thanks
Great series of articles. My son turned me on to the mighty MN. I love my model 59 kicks like a babushka and spits fire twice as far!
Rock Solid Industries, Max Sheppard and Boltman will all sell or modify your bolt. Rock Solid makes a “rock solid” scope mount and Brass Stacker makes one that mounts over your rear sight and lets you keep your iron sights as a backup.The Brass Stacker mount requires a long eye relief scope much like a scout rifle.
Check out Socamo.com it is a great forum about Mosin Nagants. There are areas for classic untouched collectables and for Ultimate modded Nagants and about anything in between. I have no association with them other than enjoying the information provided.
Enjoyed the article on the Mosin Nagant shooting high. My problem is I don’t have the type of front sights you show in the example. Mine is a single edged piece attached the same way but not a post in a round sight. How can I extend my site and make it taller?
Thanks
Duane, Your sight should drift out to the left. You could just take it to a “GOOD” welder or machinist and have him cut off your old blade and weld on one taller. You could then adjust the height by filing or grinding it down bit by tiny bit after you drifted it back in. I suspect you have either a Dragoon or a Finnish model. If it’s a Finn they are the best shooters of the Mosins IMHO.
Very interesting article. I have recently come across a difference in Mosin stocks that has me wondering. There is a slot in the channel of some Mosin stocks where you can see through to the cleaning rod. In other Mosin stocks there is no slot whatsoever. Are you aware of any purpose for this slot ? Heat dissipation, barrel harmonics, lighter ? With all the history out there on the mosin I can’t find a single bit of data that discusses this discrepency. Thanks in advance.
Thanks, but I got nothing from this at all. All the useless words in the attempts at humor were annoying. You can buy site tools and longer front site posts on ebay.
You can also take your front site ring out, they are installed from the right, remove the front site pin, and make your own longer one, harden it and blue it with a touch up bluing. If you don’t have a metal lathe like me, you can use a hardened bolt in a drill press and file, or get your welder out and built the original pin up, and you know the rest. I have an M1891 and a M81/31 MN. Each one took 3 days to clean and restore. They are like works of art now. One more thing, if you have an SKS and want to make the trigger pull better by making the sear safer and smooth action, there are videos on YouTube to teach you that. The 20 round Tapco mags for them are the way to go, get rid of the original wood stock too.
Attended a gunshow, in Sanford, Florida last weekend 9/15/2012. Have wanted a Mowsin Nagant for a couple years.
An NRA Good 1891/30, 1943r Ishvesk markings, with all matching numbers, very clean, perfect bore, w/sling, bayonet, ammo pouch with cleaning kit, for $145.00. Spare ammo pouches are $1.99.
Bought a double tang buckled belt at Wal Mart for an ammo belt, with 4 pouches.
Apreciate your info and have lengthened my front sight post with white wire insulation. Duct tape on the cleaning rod.
100 rounds of silver tipped ammo was $25.00. I consider this all to be a very
good deal! Read that some American forces were issued and used in WWI.
One question is about available ammo. is the silver tipped ammo lead, suitable
for wild hogs, deer, game? Or, is it FMJ and just painted? FMJ is hard, and
penetrates through, so not suitable nor legal for four legged critters…
Great to have, shoot, and preserve some of our history! Got the bug, so might
file for a C&R and buy 3 more! Then, build a wooden rifle rack, for display!
Great info. The best write up ive seen yet. Thank you for the info.
I think the FORS acronym is backwards. It should be front same, rear opposite for example if rifle shoots to the left, the rear sight should be moved right or front sight to the left.
John, FORS is in relationship to what you want the bullet impact to do; if the rifle consistently shoots left, you want the impact to move right, so you would either move the front sight to the left (opposite) or rear sight to the right (same). So Front – Opposite, Rear – Same.
Mosin Nagants and so easy to work on. I’m finishing my 4th restoration of one right now. Making it a PU sniper with an original style Ukranian made repro scope. It’s going to be my “Mosin masterpiece,” and will only cost me about $350 total plus a lot of hard labor. These things are probably the simplest rifles you’ll ever work on. Lots of good youtube videos to show the way as well (the series by iraqvet8888 is very good), so don’t be afraid to dig into one. I can now fully strip one (including removing all of the metal and taking apart the bolt) in about 10-15 minutes.
I’ve also been able to get the trigger pull down to about 3.5 lbs. with full seer engagement, no grittiness, a decent break and no chance of slam firing. 2 lb. pulls with the stock seer and trigger are achievable if you want to risk reducing seer engagement (which I don’t). So, IMO a good trigger job is a big accurizing step since many start out with > 10 lb. pulls. I’ve learned a lot of little tricks along the way to improving and restoring them if you guys are interested.
Ralph,
Great tips. I’m on my 4th MN a model 59, aresenal refurb. I’ve seen the prices go from $60 20 yrs ago to $300 today. I love to take her to the indoor range and blast it. You can read by the flash.
I don’t know if you mentioned it in previous columns, but I use Windex to clean her. With ammonia, it totally removes any of the corrosive powder left from shooting.
Thanks again.
JS
Ralph, at the end of this article you said “In our exciting conclusion, we’ll gussy up the furniture, also without altering the rifle.” Does that mean there is a part 4? I certainly hope so! I’ve just recently fallen in love with this Russian Supermodel. I’ve named mine Natalya. I thoroughly enjoyed all three articles. It sounds like we have a similar sense of humor. Keep up the good work! До следующий раз друг! Будьте здоровы!
What if I don’t like the look/idea of having a piece of wire insulation over my front sight post? Tough?
How would I go about doing it the “American” way?
When will we see part 4?
Excellent articles ive learned more by reading these articles than I can ever express,my first was a 1943 Iz,all numbers match got lucky I guess,second is a 1934 Iz also with many different numbers bolt is a tula,I really appreciate all the work Ralph has put into his work ya can tell it is a labor of love,I really like these weapons,the history,everytime I hold my 1943 I think of stalingrad,ive been bitten by the bug I must confess,I recently joined a club associated with the CMP,plan on a m-1 garand someday,the history is overwhelming when you think of the men who depended on these for survival,THANK YOU RALPH GREAT JOB,mmkkpro
JMECK makes a scope mount that has a band that wraps around the barrel between the bottom bolt tang and the magazine,I got the see thru design so I can still use leaf sight,imho its a very good piece and no damage to the stock holds zero very well,my eyes are getting old and the 3 by 9 by 50 nikon prostaff solved that problem,looking at an arch angle stock in the future for one of my mosins that was bubbized before I got it,the arch angle stock is in itself a work of art and also allows a 10 round detachable mag,I would not consider tbis on my 1943 or my 1934 they are just like they were issued,my bubbized will get the arch angle as funds allow.
please send me part 2. Also any new parts.
Thank you.
Reason for having the 2,000 rear sight: salvo volleys.
Good write up, thanks for taking the time to do it.
Sir, you are the finest gun writer I have come across, and I commend your work! I also just bought my first gun, which happens to be a Mosin, and I found your write-up practically very helpful, so thank you!
I’m a little confused, I took off the top part of the hand guard, and I could get a bill sliding around under the barrel without unscrewing any screws, but there’s obviously friction/contact even while holding the rifle vertically. If I want to float the barrel, should I be doing this test with the lower hand guard resting on a sandbag? (Like firing position?) And suppose I give it just a small gap, wouldn’t the barrel deflect into the guard upon firing? So I should try to give it more of a gap, no?
I finally got around to reading this series.
Excellent reading. Thank you Ralph.
I am now better armed with knowledge to pick up my first MN.
Awww c’mon Ralph! What’s the big deal about the bayonet? LOL! Half the fun of owning a Mosin is having a rifle that stands nearly as tall as I am! LOL!
The bluing on my Mosin was already marred from previous service, so I didn’t see that as a big deal. What I did to fit the bayonet was used some valve grinding compound and an old 20 gauge mop and worked at it until the bayonet was a nice snug fit but didn’t require a lot of force to put it on. Then I coated the inside with some oil, and it’s good to go. Suppose I could touch up the bluing with some Dicropan one of these times, but again I just don’t see it as that big of a deal.
Otherwise great article! Thank you for sharing.
I tried that electric insulation trick, it worked, but it is a little too wide. I hit a piece of notebook paper at about 60 – 70 yds 5 shots in a row, but the sight covers the paper entirely. I ordered a bore laser, I may take off the insulation and try other methods later. I like these guns. Every time I look at mine I imagine myself in a bell tower on a dark cold Russian day, and every time the thunder cracks I take another facist. Is that weird?
I was going to buy one of these two days from now, just to have one, and maybe to hunt deer with it since most of my shots are less than 50 yards. This gun seems more trouble than it’s worth…
It’s not Adam, it’s a. 30 cal rifle for 100ish. It shoots a bit high, and has a harsh trigger pull. That’s about all the trouble it’ll give, and those are fixable problems. Not quite a state of the art target rifle, but I think they’re well worth what little they cost. Eventually when all 20000000 are bought up you’ll start seeing $249.99 price tags on them.
the sights go to 2000 meters for the same reason as the high settings on any military rifle, Section fire. an individual wont hit anything at that range but with enough people firing its at least enough to get the enemy to duck down and take the pressure of your buddies somewhere else on the battlefield
This was an amazing read and has really helped me out with the basic knowledge of this rifle. Im going to go check out a few today and will use all of my knowledge from this article :). Amazing Article, Five Stars all the way.
My Mosin Nagant cleaning rod doesn’t rattle or touch the nose cap so please change the statement “they all do” because that offends me that my rifle has something said about it that isn’t true. Like calling guns evil.
Joe Clark
If the bayonet is tight it’s because it’s a refurb. They smash the diameter down so the arsenal could refit them before issuing them again.
“Many Finnish M39 Nagants had floated barrels, and it may be that”
The M39 is a different beast. The harmonics aren’t going to be the same. I’ve heard of paper shims being used on 91/30’s tame the barrels harmonics but I wouldn’t go removing wood.
Comments are closed.