That dusky beauty from Tula has her sights set on you, boychik. As for you, well, you can’t wait to finger her trigger. But your friends are telling you to forget it. They say it’ll never work out. You come from two different worlds. She’s too loud, she has a history and you can’t trust her to be a straight shooter. The first chance she gets, they say, she’ll kick you to the curb and cause you pain. Well, you know that she’s a smooth operator because you’ve checked out her action. And even though she used to run with a dangerous crowd, you consider it part of her charm. Most of all, you dirty dog, you can’t keep your sweaty paws off her butt! So you think you’re ready to take her home to meet the family, right? Nyet! Beauty, my friends, is only skin deep. It’s what’s inside that truly counts . . .
Before waltzing out of the store arm in arm with Natasha Nagant, a savvy buyer will perform the requisite due diligence. Yeah, sure, I know that a gunsmith is going to check out the rifle before it’s fired. By then money has changed hands, paperwork filed and the buyer pretty much stuck with the rifle. It’s better to field-check a Nugget before buying and then having a ‘smith confirm the field tests. So let’s begin.
Doing a Background Check
But first, the inevitable safety warning. Know and obey the rules of gun safety before you handle any gun, even one that’s older than you and should know better. Keep the muzzle pointed in the proverbial “safe direction” at all times, which as far as I’m concerned means “not at me.” You will need to depress the trigger when you’re examining Nagants, so check and double check to make sure the rifle isn’t loaded and neither are you.
Don’t do any of the following tests with a loaded rifle — if you shoot somebody while you’re flagging the room, that somebody may get pissed off and return the insult with an even larger and more powerful gun. While it’s true that we should all reduce our carbon footprints, premature death by gunfight is an extreme way to Save the Planet.
Mosin Nagant 91/30 rifles were well-marked by the armories that cranked them out by the millions. This is not a guide to marks. Suffice it to say, the marks tell exactly where each component of a Nagant was crafted. Nagants are often advertised as having “all matching serial numbers,” but sometimes that’s a big, steaming pile of бык дерьмо (that’s Russian for “bull kaka”). A lot of 91/30s were re-arsenaled, sometimes more than once.
During the process, worn out or damaged parts were scrapped and good parts were reused or manufactured to create functioning rifles. After that, matching serial numbers may have been applied to the replacement parts. While not impossible, locating an early, as-issued Moist Nugget with original matching numbers is just a bit easier than finding a Brady Wingnut who supports concealed grade-school carry by convicted preadolescent pedophiles with ADHD and hemorrhoids.
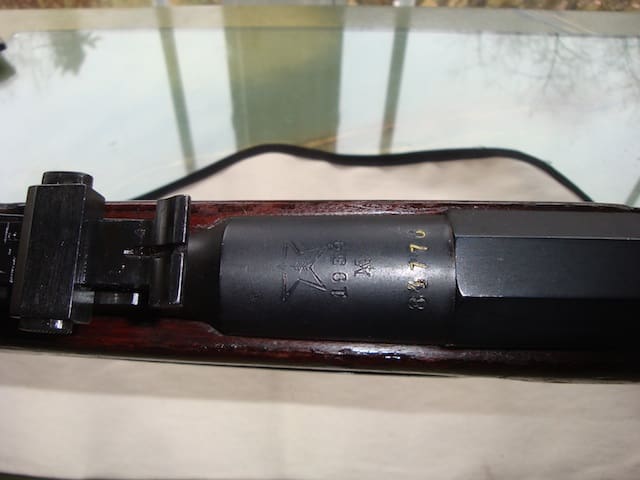
Here’s a top view of a “hex receiver” 91/30. It has the Tula arrow-in-star marking. Hex receivers are supposed to be better than round receivers, and Tula better than Izhevsk, but that’s more myth than reality. The receiver is dated 1934 and has a serial number that matches every single part of the rifle, from the bayonet to the buttplate.
The bolt has a matching serial number, but the bolt handle carries the arrow-in-triangle mark (not shown) that says the handle, at least, was made in the Izhevsk factory.
 Even the two barrel bands on this rifle don’t match; one is from Tula and the other from Izhevsk. So what’s the upshot of all this? Since we’re looking for a shooter, the answer is “not much.” This mixing-and-matching isn’t uncommon with Nagants and doesn’t mean that the rifle is “bad” or that the bolt is “mismatched” to the receiver. Such a rifle will not be inherently less accurate or less safe than one that is “as issued.” When selecting a shooter, the tests are more important than the marks. So let’s test.
Get Her Nekkid
Doing a proper physical exam on a Nagant requires some basic tools, and I mean basic. Everything that’s needed can be carried in a pocket or purse. The entire kit consists of the Nagant teardrop multi-tool, a bore light, a late-model Roosevelt dime and three headspace gauges. Okay, the dime isn’t really necessary. I only put it in the picture for scale. The other items will definitely be required.
Now we’re gonna go all TSA and strip-search this rifle. Start by removing the Nagant’s bolt. It’s so simple, even a cave man can do it. With finger off trigger, lift up the bolt handle and open the bolt. Check the chamber again and be certain that the rifle is not loaded. Now depress the trigger and pull the bolt all the way back. The bolt will slide right out.
Now that the rifle has been ballistically incapacitated, put the bolt aside and check the crown. If it’s wider than the rest of the bore, the rifle has been recrowned or counterbored. Don’t buy it. The ‘smith who did the job may have been a genius or an идиот. Since nobody knows which, move on. Fast. If the rifle doesn’t have a good crown and bore, it won’t be able to put a bullet in the ocean from the beach.
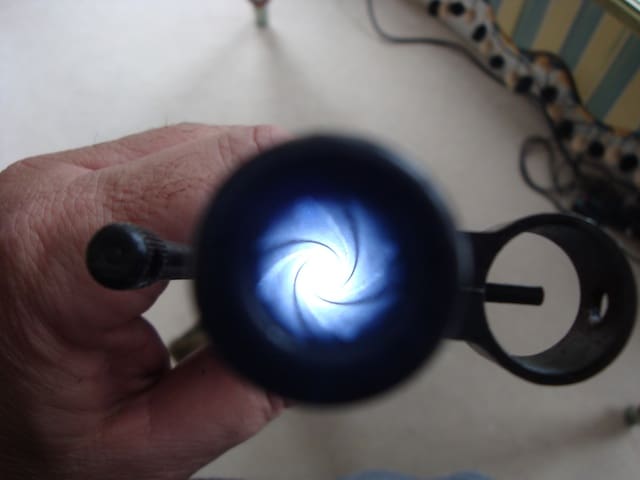 If the crown checks out, examine the rest of the bore with the little goose-neck bore light. Bore lights sell for as little as $2.95, and such an insignificant sum will prove to be the best kopecks a Nagant buyer ever spent. Put the bore light into the receiver and eyeball the entire bore from the muzzle end. Take plenty of time. The bore is likely to be dark. Hey, it’s an old rifle that’s been stored since before Al Gore invented the Internet. Still, the bore should not be pitted. The grooves should be complete and deep and the lands should stand proud. Just say до свидания, кот котенка if the bore fails this rudimentary test, and move on.
The Nagant does have one weakness, and it’s the thickness of barrel, or rather the lack thereof as evidenced by the photo. Purpose-built for fighting in cold weather, the Nagant functions perfectly in Arctic and sub-Arctic conditions where the barrel would more likely freeze than overheat. In more temperate climes, the barrel can get hot to the detriment of accuracy. Well, I can live with that. If the Nagant had a thicker barrel with more steel, I’d need a wheeled cart and two oxen to move it about.
Memo to Randy Couture: Screw the Tower 200, Sunshine. You got a Nagant, you got a gym. Wanna try the Mother of All Workouts? Try humping this rifle a thousand miles and conquering the Third Reich.
If you’re not already exhausted from lifting the beast, it’s time to check the firing pin with the Nagant tool. Usually, the rifle will come with the tool, but if it isn’t so equipped, one can be bought online for about a hundred and forty rubles. Wow, that’s only five bucks American! The multi-tool was designed for illiterate peasants to use, so anyone like me — having at least a rudimentary intelligence — can wield it to good effect.
The Nagant tool has four rectangular notches cut into it, like the teeth on your front door key. The two notches in the middle are for checking the firing pin. The smaller of the two notches checks the minimum depth. As illustrated, the pin should be too tall to pass through this notch.
The taller notch checks the maximum depth. The pin should pass through this notch. A firing pin is correctly set when it passes both tests.
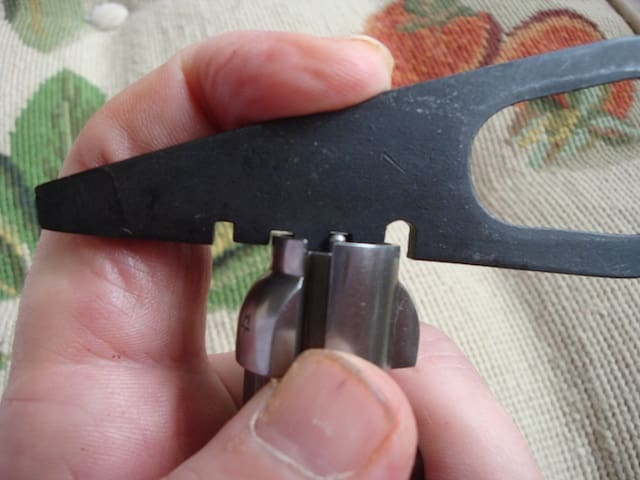
It’s so easy to adjust the Nagant’s firing pin that any failure of these tests raises a major red flag for me. I don’t know why any seller wouldn’t fix a poorly adjusted firing pin, so I would reject a misadjusted rifle unless the seller was prepared to correct the pin and allow me to the recheck it right then and there. Others are free to disagree, but I believe that being picky is bad for noses but good for choosing a first Moist Nugget.
Why is firing pin depth so critical? When the pin-strike is pansy-light, the rifle will misfire. It’s even worse when the firing pin punches too deep and penetrates into the case like the Red Army punched through Berlin. The hot gasses that were supposed to propel the bullet downrange may then choose instead to propel the bolt backwards through the shooter’s T-box, giving an entirely new and non-technical meaning to the word “headspace.”
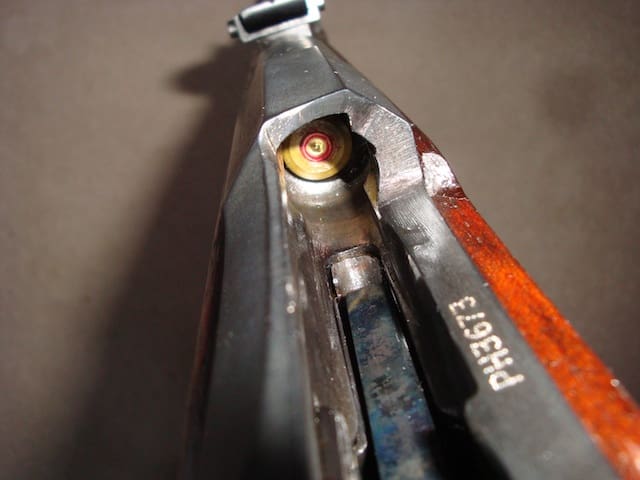
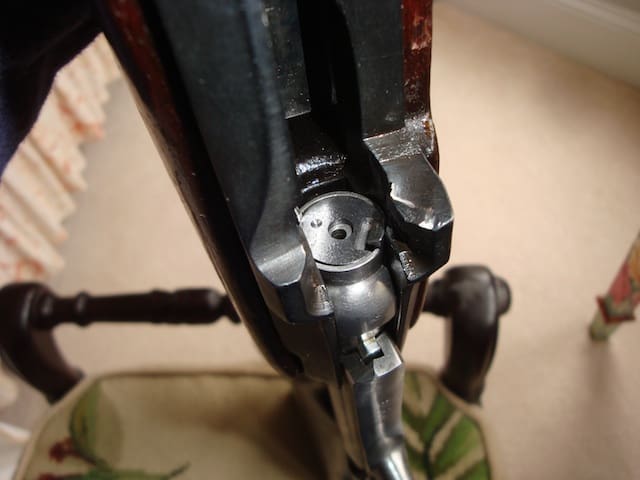
Speaking of headspace, I don’t mean the distance between someone’s ears; I mean the distance between the bolt face and the chamber face. That’s where the rim of the Nagant’s cartridge will rest when the rifle is loaded. The photo shows a cartridge case in its proper firing position.
The headspace must be checked before the rifle is fired. With too little headspace, maybe the bolt won’t close and the rifle will be inoperable. That would be a stroke of luck for the shooter because a bolt that is forced closed can create excess pressure in the cartridge. With too much pressure, the shooter will be in a world of hurt. Overpressure will rupture the cartridge case and blast those superheated gases and perhaps even the bolt through the rear of the receiver in the direction of the shooter’s mug, which he or she can then kiss goodbye with any lips that might remain.
At the other end of the spectrum, there’s the issue of too much headspace, as opposed to too little. In the former case, the gasses that are supposed to propel the bullet downrange will take the path of least resistance, which again is toward the shooter, thereby causing the same monumental fail and extreme loss of face.
Now, the good news. Although I’ve heard of rifle failures due to improper headspace, death or serious injury seems rare. Why is that good news? Because it means that the path to internet immortality awaits anyone who stupidly fires a Nagant without checking the headspace, resulting in a well-perforated forehead. What an opportunity! Just be sure that someone nearby gets it on video and that both parties have Blue Cross or a generous burial plan. Or, just do the right thing and check the headspace.
Now, the better news. Handy dandy headspace gauges are available, and they don’t require a gunsmith to use them. Some gauges require disassembling the bolt and removing the firing pin. That’s easy enough to do, but the seller may bolt if you mess with the bolt, so get a set of Okie Headspace Gauges instead.
Okie Gauges is run by Todd Griffith, who is both a Nagant fancier by avocation and a machinist by trade. Todd makes a set of headspace gauges that do not require removing the firing pin. Just open the bolt, carefully place a gauge in position, and close the bolt. With the “Go” gauge positioned on the bolt face as shown below, the bolt should close properly. If it doesn’t, there’s inadequate headspace and the rifle should be rejected unless the buyer is boinking the neighborhood gunsmith.
The “No Go” gauge should stop the bolt from fully closing. If the bolt closes all the way, there is too much headspace. At this point, I would reject the rifle even thought it might not be unsafe to fire with standard loads. The final test uses the “Field” gauge. The bolt must not close on the Field gauge, or the rifle is unsafe, period. Either run away from it, or ship it off to Osama bin Laden for a happy little birthday surprise.
Having passed all the aforementioned tests, now Natasha can come home.
Cooking Up Some Cosmo
Cosmoline or, as I loving call it, the Devil’s Snot, is hiding somewhere in that rifle. Count on it. Cosmo can be removed with mineral spirits, engine degreaser, brake cleaner, other noxious chemicals or my personal favorite, heat. Heated cosmo turns into a viscous liquid that’s easily drained from Nagant parts, and most Nagant parts will fit nicely into a typical kitchen stove – even the stock. The downside of removing cosmo with heat is the stench. Unless your spouse or significant other is very understanding, he or she will not appreciate you fouling the cookie sheets, oven or air.
So here’s the plan, Stan. Get thee to your local hardware store and procure some mineral spirits, engine degreaser or brake cleaner. Then get thee to the Stop and Shop and purchase some disposable foil pans of appropriate size to hold the Nagant parts and a roll of aluminum foil. Also obtain a disposable brownie pan and a box of your favorite brownie mix. May I be so bold as to recommend Ghirardelli Double Chocolate Brownie Mix? It’s a bit more expensive than Duncan Hines, but you’re worth it.
Back at the ranch, preheat the oven to its lowest setting, which will be between 150 and 200 degrees depending on the oven in question. It doesn’t take a lot of heat to melt cosmo, so treat your rifle like a lady and be gentle. While the oven is preheating, break down the rifle and position your components in the disposable pans, use crunched-up aluminum foil to position the parts so that the cosmo will run out instead of running in. Unless you have a commercial pizza over handy, the barrel will not fit. We’ll use hot water to clean the barrel. Fill a whistling teapot with water and put it on the boil.
While the parts are baking, prepare your brownie mix by following the directions on the package. After the gun parts have been heated for a half-hour or so, remove them to cool and reset the oven to the proper temperature for brownies. Let the parts continue to cool and the oven warm until both have reached their correct temperatures. Now pop the brownie pan into the oven and let the beguiling fragrance of baking brownies infuse your home.
When the rifle parts are cool enough to touch, work them over with your chosen chemical and a toothbrush. Dry and clean them with your gun cleaner and oil with gun oil. Pour hot water slowly down the barrel, then dry with patches. Scrub the bore with your bore solvent of choice to remove any copper, lead or other foreign deposits, then clean it with your gun cleaner and lightly oil. The brownies will be ready by now, so remove them to cool. Use the water remaining in the kettle to make tea. I’ve heard that chamomile is very soothing and goes well with cosmoline.
Now you have a clean rifle, a sweet-smelling home and a happy spouse or significant other who is nibbling on a brownie and sipping tea. Show some class and keep your pinkie up. Ain’t life grand? While you’re at it, do the planet a favor. Dispose of the used chemicals and cosmo properly. All petroleum-based products are carcinogenic if ingested, so don’t put anything into the ground or water that you wouldn’t put in you, because that’s where it’s going to end up one way or the other.
In the next installment, we’ll clean up the stock a bit, sight in the rifle and destroy some shit. Guaranteed, there will be a trick for adjusting the front sight that you’ll absolutely love.
[Click here for Part 1]
[Click here for Part 3]
[Click here to read Chris Dumm’s review of the Mosin Nagant]





Excellent piece Ralph!
I’ve got 2 that I was given, so I have done zip save for lubing them. I guess I will now have to actually check them out a bit next time I drag them out of the safe.
Great job as usual Ralph, I’m sure these tips can help people avoid getting ripped off and remain safe at the same time.
Great article!
Let me add a note of urgency t oyour advice to degrease the gun FIRST, before you fire it even once: Most ‘sticky bolt’ problems are caused by failing to get the cosmoline out if the chamber, bolt lugs, and breech locking lugs before firing. It’s easy to clean BEFORE you fire the gun, but once it gets cooked in there it’s a bitch to remove.
Wonderful article- and great photos, too. Thanks!
There is nothing, and I do mean NOTHING like the smell of cosmoline from an old Soviet Mosin Nagant.
Cosmoline from Mosin smell like victory, Komrade….or maybe like getting close to victory but deciding to drink vodka instead, and waking up three days later in day-old borscht in ditch beside sidewalk in front of old tractor factory.
Dah.
I have, over the years, bought more Mosin Nagants than I care to admit. Two are still in my safe, and the rest were given away as gifts.
One is a Finnish M39 Nagant, which is a bit more refined than your typical Soviet model. Of course, all Finnish M39s started life as Soviet Mosins, but got turned into M39 models after Ivan and Anton graciously toted them all the way to Finland first.
I love the smell of milsurp ammo in the morning. It smells like . . . cat piss.
I’m really enjoying this series of articles! I was turned on to Mosin-Nagants over on Freerepublic.com, as they are quite popular among Freepers.
Got my first Mosin at a gun show this January- and, sure enough, it’s been counterbored. I’ve only put about twenty rounds through it so far, and that at short range, so we’ll see how that affects accuracy.
Mine does have matching serial numbers, but they were definitely not original- it has a Remington bolt handle! Since it bears refurbishment stamps on both the barrel shank and the stock, I have this vision of armorers working on rebuilding rifles, and just taking parts out of huge bins to make a whole, then stamping identical numbers on all of them.
I did, though, invest in a field gauge from Okie gauges to check it before firing- and carry that gauge in my wallet for future use 🙂
Rather than smell up the house when cleaning cosmo by using the oven, I’ve got a small 1-gallon wall paper steamer with the head removed and a brass barb in it’s place.
If heat or hot water work to remove cosmo, why not both from one source?
I buy enough surplus rifles that this steamer has more than paid for itself, having cleaned 16 rifles so far and still going, including 2 Mosin’s that were originally chemically cleaned and suffered severe sticky-bolt. Steam fixed those 2 right up.
With a properly sized adapter, it makes very short work of cleaning the barrel after a long range day digesting corrosive surplus.
I still have, and have no problem buying, lots of chemical cleaners, the steamer just works better, and cheaper, for me. A lot less aerosol cans to dispose of, reduced risk of chemical interactions in your rags or trash, and fewer patches needed on the bore.
If you plan to buy a surplus rifle that have had the cosmo dunk more than once, I highly recommend a steamer.
If you don’t want your oven to smell like cosmo or you just feel odd baking your brand new old gun, you can take a black trash bag filled with kitty litter, put the wooden parts in there, and then leave the bag in a sunny spot for a few days, periodically shuffling the litter and parts around.
Non-chlorinated brake cleaner works wonders for cleaning the metal parts, but keep it far, far away from the wood, it’ll eat that pretty Russian ruby enamel off in moments.
However you clean it, no matter how meticulous you are, the first few times you go to shoot it, more cosmo will weep out. Take a rag with you if you don’t already.
if the bolt shoots out the back of the rifle, you have bigger issues than a ruptured case…
the bolt handle locks on the receiver when it is in the down position and servers as the bolt’s third locking lug…
for the bolt to go through your skull, both locking lugs and the bolt handle, or receiver side would all have to fail, at the same time…
if that happens (not freaking likely) your number was up anyway….
Where is the next installment been waiting what seems like forever now sheesh
Hi Ralph ,
Nice and informative post : However Nagants are Imperial Russian Revolvers and Mosins are rifles that have served well for 120 years . The most appropriate name for the rifle is Mosin 91 , Mosin 91/30 or Mosin Nagant if we must bring the Belgian fellow into it .
Bought my first Mosin 91/30 a few weeks ago, successfully disassembled and cleaned off the cosmoline, then put it back together. I was having some “sticky bolt” issues so i decided to break it down again for a more thorough job. when I reassembled the rifle, (including putting the bolt back on) I realized the trigger was slack and that the trigger pin had fallen out. However, now I can’t get the bolt off to put the pin back in, since it’s covering the top screw. Any tips? Or is a gunsmith in my future?
Bump to top for awesomeness. Just picked up a 91/30 and a can of ammo. Thanks for the great write up. It feels like a piece of junk back to back with my 1917 eddystone but it gets the job done just as well I bet.
All 3 parts of your article are amazing.
I just acquired an M44 1945, I will be receiving it in the next week or so.
But I can not wait (seriosuly) to detail strip and clean out the cosomoline and bond with “Natalya” hehehe. Thank you for the write up and detailed pictures. Much appreciated!
Just purchased my first Mosin and am literally laughing out loud at your insightful and hilarious articles. Very good information and much appreciated.
EXcellent Ralph, really enjoyed the info and the humereous way it was presentedI now own 4 mosins, a t-53, and a nagant 7 shot revolver, next a yugo mauser, then a r-11 and a r31 swiss, then a #4 enfield, whats your thoughts on these old timers?? thanks Jared Stanfield, Homer, Ill.
I used a hair dryer to melt the Cosmoline. Worked for me.
Great writing Ralph! I just bought a 91/30 that appears to be de-cosmo’d. I cleaned it and hope to shoot it soon, after I check it’s headspace. Your humor probably is more effective in getting new mosin owners who are not well seasoned rifle cats to pay close attention to the safety aspects of owning “vintage” firearms. The accuracy information is fantastic. I’ve had a few cocktails this evening so I will sign off here and retire to dream of several “Natashas”. Good work! thanks. Bill Nichols, Louisville, KY
It’s not good to be a “know-it-all” so I came across this article and figured, maybe there is something new I could learn. Well I get to the part titled “Get Her Nekkid” and I see the picture “Tools for Mosins” with everything I’ve used, plus a dime. Then I start reading “The entire kit consists of the Nagant teardrop multi-tool, a bore light, a late-model Roosevelt dime and three headspace gauges.” You really dropped the dime on me! I was thinking, wait what is the dime for, what did I miss?!? Then, “Okay, the dime isn’t really necessary. I only put it in the picture for scale. The other items will definitely be required.” Yeah, that was fun. Very good article by the way. Keep up the good work.
You say check the crown..can you show an example of a bad crown job..ive reverse crowned 1911s and I can’t imagine a machinist or gunsmith botching a crown job..what exactly is a newbie to nagants supposed to look for? Also should my local gun shop that boys crates of these include the tool? And who sells the three shim guahes and what thickness are they just in case I would want to verify w dial calipers.thank you
Cabela’s has a supply of 91/30’s for sale. If anyone in the Atlanta area is a knowledgeable Mosin enthusiast, I’d be interested in some assistance inspecting/selecting one.
I can be reached via e-mail at [email protected]
–Mike in Atlanta
I just picked one up at a local store up here in Maine. Ralph wasn’t lying when he talked about the Devil’s nose juice that is cosmoline. Holy crap, that stuff is like the ectoplasm from that weird birthing scene in Poltergeist. The only good news is that to get rid of it all, one really gets to know his new rifle. I just ordered an Okie no-go headspace gauge. There is just a terabyte of good information in this piece, Ralph. Thanks for putting it together.
I’m actually looking for a mosin for myself, where is a good place to get one? Gun Shows? Online? Has anybody gotten one from aimsurplus.com? They are reconditioned mosins, but online doesn’t give the opportunity to inspect….
Comments are closed.