While driving to an open shooting position on a recent range trip, I saw AR-15 type firearms in every bay as I looked around. Some bays had as many as 10 different varieties of the AR-15 platform rifle. I saw another local gunsmith test firing the fruits of his labors.
I watched a group of 20-somethings challenge each other on a timed course of fire. I observed a dad helping his daughter to hold the gun up while she shot ground-mounted clay pigeons. I even saw a married man in what appeared to be his 60’s trying to tell his wife how to pull the charging handle back.
The common theme in what I saw was this — all of these people had different reasons for purchasing their version of America’s most popular rifle. And none of them appeared to have had any standardized training in their use, care, accessories, or capabilities.
While looking for some common ground, I made a list of seven skills that every AR owner should know.
Proper Low Ready Position

The “low ready,” challenge, or guard position has been a mainstay of law enforcement for years. We use it because we don’t have rules of engagement. We have the 4th Amendment and Supreme Court Decisions to follow.
The low ready position is a presentation of the weapon when there’s a potential threat that must be identified prior to be being engaged. It needs to be aggressive, safe, and comfortable. When properly utilized, there’s almost no risk of a negligent round injuring the potential adversary at the business end of the gun, but it’s extremely fast to engage from here if need be.
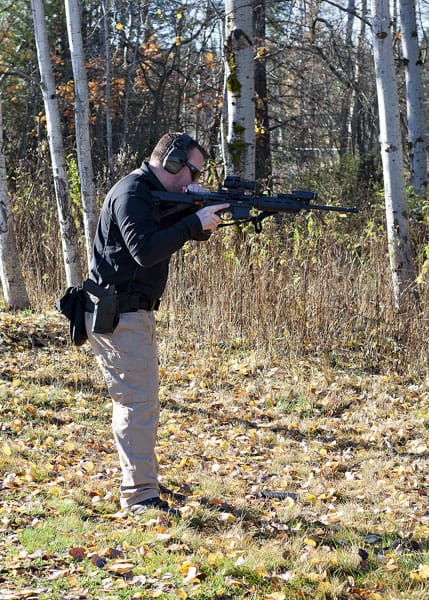
Start with in my normal shooting position. The toe or bottom of the buttstock is high on the shoulder/clavicle notch. The muzzle of the firearm is pointed towards the ground at an approximate 45 degree angle, splitting the distance between me and my target.
Doing so allows me to follow the fundamental firearms safety rules, while also being able to address a threat very quickly. The safety is on and the trigger finger is indexed.
Does having to flip the safety on sound too slow? I’ve been teaching this for many years and have yet to find a student or operator who was measurably faster when starting with their safety off during a drill from the low ready. Any extra milliseconds needed to flip that lever are worth the dramatic increase in safety.
The Combat Reload

The combat or emergency reload is probably the most poorly practiced skill by novice AR shooters. It’s also one of the most important gunfighting skills you can have.
If you’ve fired your 20 or 30 rounds to save your ass and you still need more, it’s already a bad day. There are no pause buttons. You probably can’t call for a UAV or airstrike. If you mess this up, you will not respawn. You need to know how to do this cleanly and smoothly.
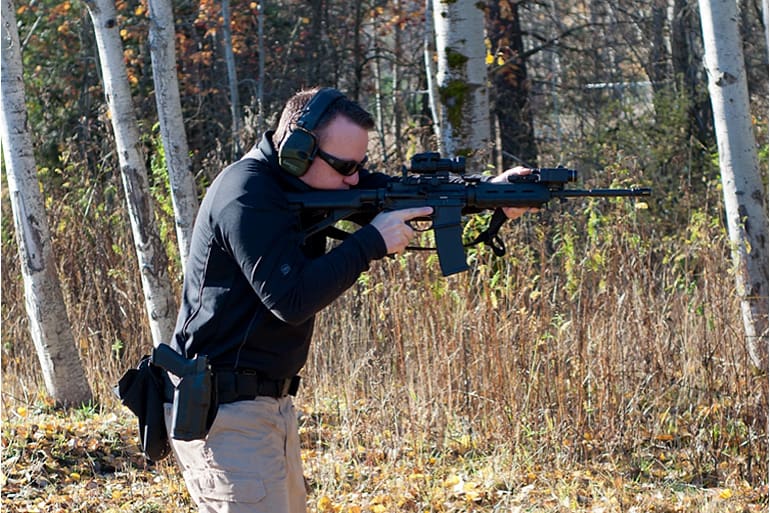
Starting from a bolt lock position, I release the firearm with my support hand as I bring the gun up into my workspace where I can see it. The muzzle of the gun assumes an almost vertical orientation (above). I form a “L” with the pistol grip, while depressing the mag catch with my trigger finger.
Usually, the inertia or snap of the gun will aid in the magazine being ejected from the gun. At the same time, my support hand moves for my reload magazine.
The buttstock of the gun is between my forearm and chest, as I’m too lazy to hold its full weight. A new magazine is inserted with a slap, followed by an immediate pull.
As I bring the gun back on target, my support hand moves up the receiver. Once over the top, the bolt catch is depressed, then the support hand follows the lines of the rifle back to its shooting position.
Why go through all of these steps and hold the gun like that? Simple: it works. Also, I’m lazy and it doesn’t take my eyes of what’s in front of me.
Trying to reload a rifle (or pistol for that matter) at full extension (or down around your waist) is like trying to tie a fly on to your line with your arms fully extended. Bringing it up and in affords you all of your dexterity and allows you to take that quick peak if there’s a problem without losing your perspective.
Basic Field Strip

This is one of the least sexy or glamorous tasks that every AR-15 owner needs to learn and use every time they shoot. But it’s not just for cleaning. It also develops an understanding of how the rifle works and is an opportunity to inspect critical areas for wear and security.
You don’t have to learn how to do a field strip blindfolded, but the continued weapons handling will increase your proficiency and confidence in the weapon. Not to mention that there’s a certain level of clean that’s required to keep the gun running.
- Ensure your firearm is unloaded and all live ammo is secured somewhere else. This is best done with the help of a second person who can verify that the firearm is safe and unloaded.
- Make sure the bolt is forward.
- Press the rear takedown pin out until it’s stopped by the detent.
- Tilt the rear portion of the upper receiver upward, separating it from the lower receiver.
- Pull back approximately three inches on the charging handle (but leave it in the upper receiver).
- Pull the bolt carrier group (BCG) straight out the back of the upper receiver.
- Pull back and down on the charging handle until it’s free of the upper.
- Push the firing pin retaining pin out of the bolt carrier.
- Tap the back of the carrier on a firm, yet safe surface. The firing pin should drop free.
- Push the bolt into the carrier approximately ½ way and turn the cam pin 180 degrees.
- Lift the cam pin out.
- Pull the bolt straight out of the front of the carrier.
- Locate the extractor on the bolt. Placing pressure on the back of the extractor, use a punch to push out the retaining pin. Do not use the firing pin to do this!
- Wipe down, inspect, and lube parts as needed.
- Reassembly follows these steps in reverse.
People tend to get nervous about taking an AR down. Don’t. It’s easy and has to be done, and frequently.
AR’s don’t have to be cleaned within an inch of their lives, but keeping them clean and in good working order is an investment in your future. Also, I don’t care who says what…no AR should be run dry.
For initial break-in, I run them wet, say 200-500 rounds. After that, well-lubed is the standard. It’s hard to get an AR to run better than it does with a fresh coat of CLP.
If you get stuck on any part of this, go to YouTube or exercise your best Google-fu. There are dozens of great videos out there that will help.
Testing and Replacing Gas Rings

The Stoner-designed gas impingement system isn’t the death sentence many would want you to believe. Piston systems are awesome. However, they aren’t the end of an era for gas impingement.
If there are any questions as to the reliability or viability of the AR, just look at pictures from Special Forces from all over the world. The gas impingement M4 is the common theme you’ll see.
“Wear parts” aren’t weaknesses. They just need to be properly maintained. I have purchased more than one 80’s era AR that has never seen a new set of gas rings. That’s unacceptable and is the single biggest contributor to mechanical problems.
After completing a basic field strip (see above), you’ll need your bolt carrier group (BCG) and three new gas rings. Always replace all three at the same time.
To test the gas rings, grasp the rear portion of the carrier and the bolt itself. Pull the two apart. This should cause the bolt to move forward, approximately ¾-inch. With the bolt extended, it’s simulating a round chambered in battery.
Now, over a table or bench, place the bolt carrier group bolt face down (above photo), standing it straight up. If the carrier can’t be held up by the tension of the gas rings, they need to be replaced.

To do that, disassemble the BCG. Once the bolt is removed, you don’t need to go any further. Use a dental pick, small pin punch, or even a paperclip to push up on the rings far enough that you can get an edge over the bolt tail.
Continue to strip the old gas ring around the tail. It’s not recommended that you use a sharp object such as a pocket knife. Once free, complete the same process two more times.
To install the new rings, just reverse the process adding a drop of oil.
There are other gas issues such as the carrier key and gas tube that can present themselves, but those are truly better left to armorers and gunsmiths.
Type Three Malfunction Fix

Oh God…the mother of all malfs. This can be anything from a slight double feed to cartridges in backwards, bullets inside of brass, cut cartridges, and gunpowder everywhere.
The bad news: improperly identifying the problem and trying to clear it wrong will only make it worse. Some will scratch their heads. Some will go to YouTube.
Some will get out a hammer. Just talk yourself through it, clear it right, and you’ll be done in less time than it takes the average shooter to reload. Here’s how . . .
Look: First, identify the problem.

Lock: Pull back on the charging handle and activate the bolt catch. This takes the pressure off the magazine and makes some room.
Strip: Push the magazine release button and drop it. Rip the magazine out if you have to., but get rid of it. Throw it across the range for dramatic effect if you want. This is the rare time when I leave bullets nearby. Chances are, in a semi-automatic firearm, the malfunction is being caused by the magazine anyway.

Sweep: If you have to, insert some fingers through the bottom of the mag well and make sure it’s clear.
When two rounds are stuck in the chamber, one is stuck in the feed ramp, or somehow a round gets jammed behind the gas tube or charging handle (yes, I’ve seen it), this is the only way to get them out. Miss this step and you just pound them in more during the next step, which is . . .

Rack, rack, rack.
This is simple, but should be done with vigor. Push/pull, push/pull, push/pull…hard and fast. Don’t let go of the charging handle while doing this. You will lose your power and take more time recovering your hand placement on the handle.

Feed it: The gun is now un-jammed, clear, and unloaded. The mag you dropped was likely the problem. Load your gun with a fresh magazine and you’re good to go.

Charge it: Get that first round in the chamber and re-evaluate the situation.

Mechanical Zero

Of all of the student and customer AR’s I’ve had on the range, the number of carbines that have their iron sights actually zeroed can be counted on one hand.
I’ve seen customers buy a top-shelf rifle and install a set of Magpul MBUS‘s on it. They then top it off with something from Trijicon, Aimpoint, or EOTech. The electronics are usually close to where they should me, but the irons have almost never been shot for point of impact.
I recommend a 50-yard zero for fighting carbines. There are more precise zeros, and some that are better for long range, but these are short range rifles with medium range capability.
With a 50-yard zero, you’re never more than mechanical offset above or below your point of aim from zero to 225-ish yards. Here’s now to do it . . .
Using a carbine with an A2 front sight base or backup sights with similar, raise or lower the front sight post until you’re flush with the housing. On the rear, almost all have witness marks. Center the sight up.
Everything here should be done with three-round shot groups. It’s best to have someone else mark your target and advise you of any shot corrections as this will keep you honest.
Continue to adjust until you’re zeroed. Once you think you’re where you need to be, shoot three more rounds to confirm.
What’s the best part of zeroing the iron sights first? If you’re using a non-magnified red dot optic like an Aimpoint, Leupold LCO, or a Trijicon RMR, adjust the electronic dot to the iron sights and you’re already almost there. It will be so close, most people won’t have to move it.
Figuring out your mechanical offset

In its simplest form, mechanical offset is the distance between the aiming point of a proper sight picture and the centerline of the bore. Due to the nature of the sights on an AR-15 rifle, this distance is approximately 2.5 inches.There are more precise measurements out there, but they have no real world purpose or application for minute of bad guy use at defensive distances.
What’s the practical application of such information? During one of our qualifications, we’re required to put one round in the ocular area of a target five times at five yards. The ocular area is the human “light switch.” Hit someone there with a high velocity rifle round and it’s like turning off the computer. Everything stops quick, fast, and in a hurry. This is commonly practiced as a hostage rescue shot.
Using an Aimpoint PRO, I find if I place the top of the 2 MOA dot on the top of the head, my rounds are centered in the ocular box. As I move back, the difference between the point of aim and point of impact becomes less and less. From a field use standpoint, the difference disappears at about 30 yards. It’s not complicated, but it’s good to know that.
-/-/-/-/-
Are these seven points everything you need to know to go forth and conquer (or protect your home and your family)? No, but they’re right on the edge of beginner/intermediate proficiency.
We didn’t get into shooting fundamentals, marksmanship, accessories, or bore cleaning. This assumes you’ve read the owner’s manual and have made your rifle go bang before.
Now go out and practice and learn some more. I’ll catch up with you on the line doing what all professionals do; getting in some range time while practicing the basics…over and over and over again.
Nick Franssen is the owner of HCTC Firearms, LLC, where he specializes in custom gunsmithing, training, and consulting. Nick is also a 10-year law enforcement officer in the Pacific northwest, where he is currently assigned to patrol. Nick has several years in the firearm industry, as a professional civilian and law enforcement instructor, gunsmith, and competitor. Nick was one of the original Idaho Enhanced Concealed Weapons Permit instructors, and maintains/repairs the firearms of several police agencies throughout the region. For more information on training or custom gun work, see HCTC Firearms on facebook or email nick at gunsmith@hctcfirearms.com.


